
Welcome to the Documentation of Foodicious Food Blogger Theme, below are the steps that will help you to configure and setup our Foodicious Food Blogger Template.
If you are finding any difficulties configuring the template then you can go ahead and purchase our Template + Installation Package from here and our team will setup the template for you:
Foodicious is a fresh and food blogger theme for food bloggers, cooking enthusiasts, and small food businesses. Idea for all food bloggers, whether you have a new blog or a blog with hundreds of recipes. With Foodicious Food Blogger Theme, you present your content in a beautiful way.
Foodicious offers rich blog styles and layouts. The Food Blog theme is easy Customizable from the Layout section. There are custom options for changing the Header versions, Slider versions, Paginations, Homepage Posts Formats and many more.
The Foodicious Food Blogger theme has three great slider styles. Three beautiful post formats: List Post Format, Grid Post Format, and Standard Post Format.
This Responsive Food Recipe Blogger theme is pre packed with customizing features from your Blogger Layout Manager. We have developed the cooking food blogger theme for our users who can find the ease of usage of a blogger template.
1. Installing the template
- Unzip the Foodicious.zip file.
- On Blogger Dashboard Click Template.
- Click on Download Full Template to keep your old template as a backup just in case.
- Click Browse… button. Find the location of “Foodicious Template.xml” select it.
- Then Click Upload.
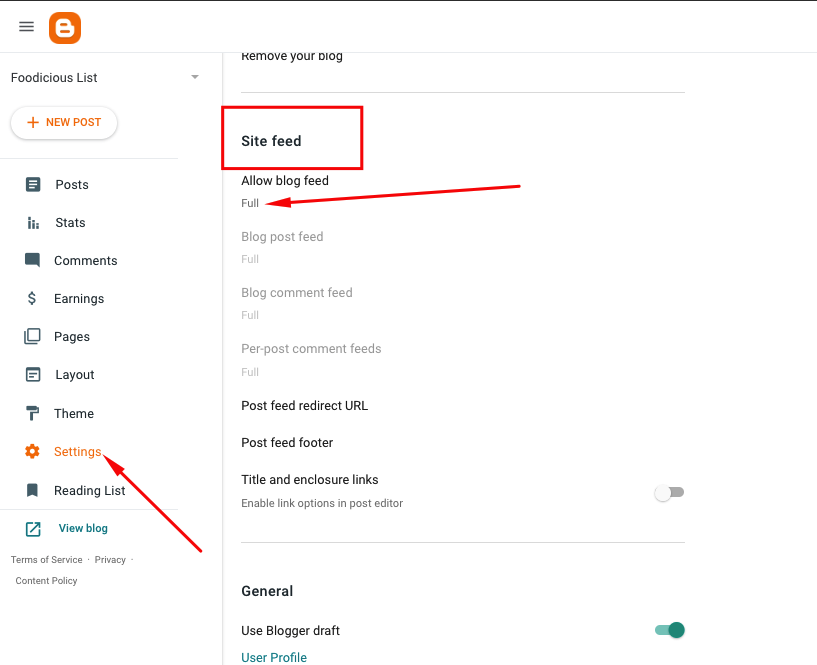
2. Blogger Setting
After installing the theme, there are minimum settings to make all widgets work fine in this template.
- On Blogger Dashboard Click Settings.
- Search for Site Feed.
- In Site Feed > click Allow Blog Feed Choose Full.
3. Add Social Links on Top Right in Menu
You Can See that the Header area have Social Icons on the right side. To place your URL’s in Social Icons you can follow these steps:
1. On Blogger Dashbord Click Layout
2. Click Social Icons Widget
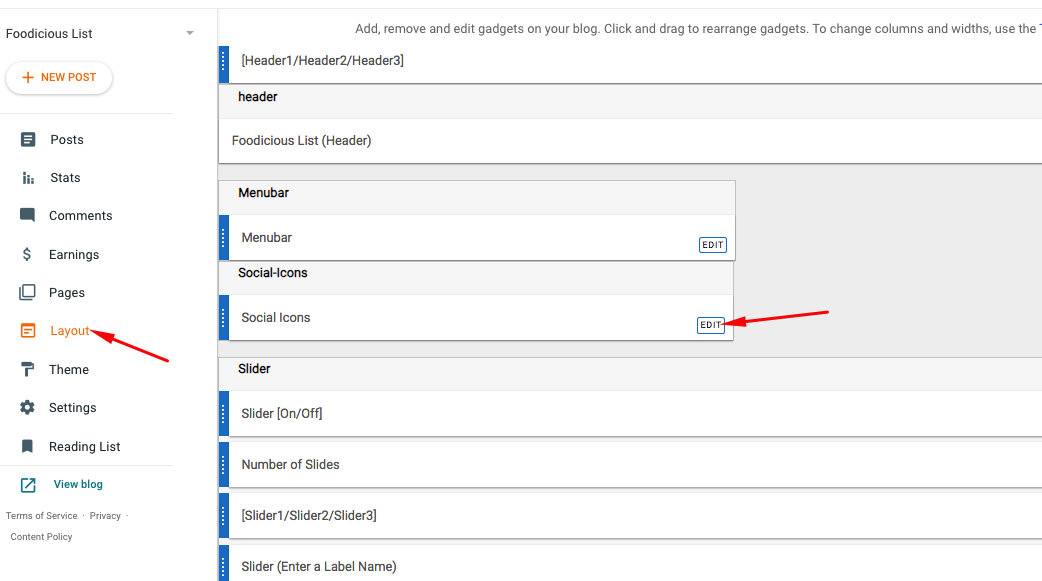
3. Enter the below code in the widget content area:
<ul class='social text-center'>
<li class='updown-wrap'><a class='updown-inner collections-icon-twitter ' href='#' target='_blank'><i class='fa fa-twitter'/></i></a></li>
<li class='updown-wrap'><a class='updown-inner collections-icon-facebook ' href='#' target='_blank'><i class='fa fa-facebook'/></i></a></li>
<li class='updown-wrap'><a class='updown-inner collections-icon-pinterest ' href='#' target='_blank'><i class='fa fa-pinterest'/></i></a></li>
<li class='updown-wrap'><a class='updown-inner collections-icon-instagram ' href='#' target='_blank'><i class='fa fa-instagram'/></i></a></li>
<li class='updown-wrap'><a class='updown-inner collections-icon-youtube ' href='#' target='_blank'><i class='fa fa-youtube-play'/></i></a></li>
</ul>
4. Change yours Social URL links by replacing # with your social media links.
4. Featured Boxes
There are 8 featured boxes just under the Slider. You can access and modify these featured boxes by going to Blogger dashboard Layout section.
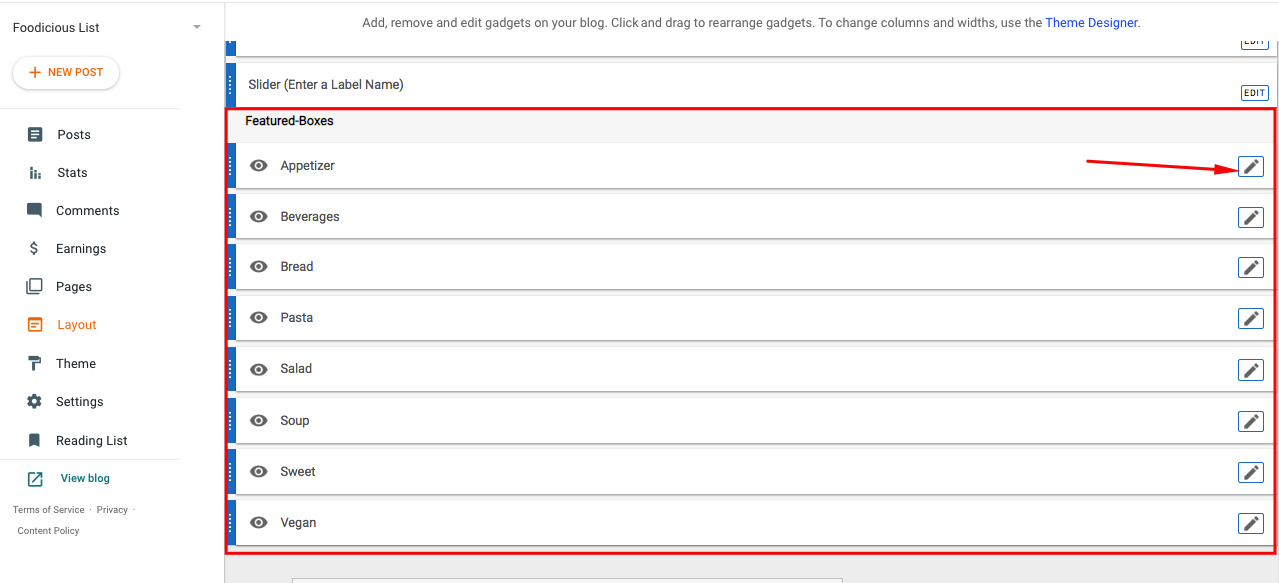
You can click on edit and the code for these boxes are as below:
<a href="#" class="featured-box-link">
<div class="featured-box-item" style="background-image:url(https://blogger.googleusercontent.com/img/a/AVvXsEibFrf5iLy8TAc-jbsoew7WwY4kSMfsrtAheia_yKJrqmIEgHE0DFpNs4Wh-dDwAEVFvD7_szShvQE1O0rFxf7H43Ni37NaPFt8c8kQG1BDeCHMnhcYPpjlTXe85gY8E5dbI1RAsauV46DaVJxJrM14dQzQIwozNV8MaO5jZUGb67ZkrbycfE1QMBDp)">
</div>
<div class="featured-box-overlay">
<h4>APPETIZER</h4>
</div>
</a>
You can change the # to your links for the boxes.
You can change the image:url to your image links.
And change the <h4> title to your title.
5. Upload Logo
Access your blog Layout > click Edit link on Header widget
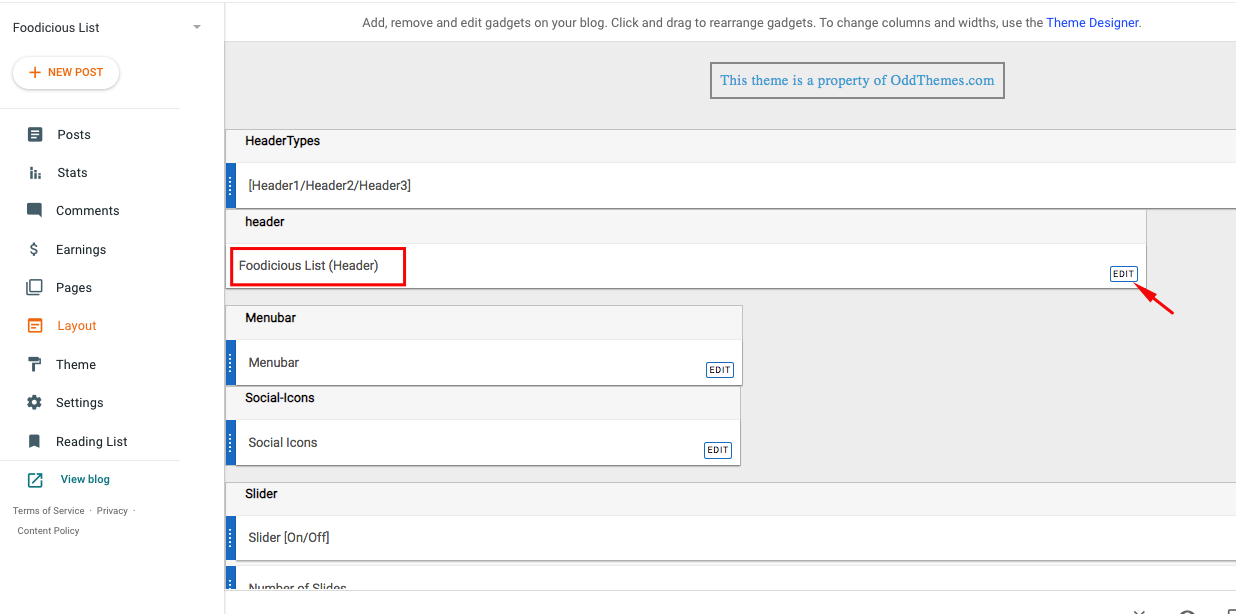
In Configure Header window, input your Blog Title and Blog Description. If you want to upload your image logo, make sure you check Instead of title and description, then click Choose File and locate your logo file. And click Save button to finish.
6. Setting up the menu
To Edit Menu in this theme you can follow these steps:
- On Blogger Dashbord Click Layout
- Find Menubar Widget
- Enter this Code :
<ul class='topmenu1' id='masthead'>
  <li><a href='#'>Home</a></li>
  <li><a href='#'>Download</a></li>
  <li><a href='#'>Social</a></li>
  <li><a href='#'>Features</a>
    <ul>
      <li class='dir'><a href='#'>Lifestyle</a></li>
      <li class='dir'><a href='#'>Sports Group</a>
        <ul>
          <li><a href='#'>Category 1</a></li>
          <li><a href='#'>Category 2</a></li>
          <li><a href='#'>Category 3</a></li>
          <li><a href='#'>Category 4</a></li>
          <li><a href='#'>Category 5</a></li>
        </ul>
      </li>
      <li><a href='#'>Sub Menu 3</a></li>
      <li><a href='#'>Sub Menu 4</a></li>
    </ul>
  </li>
  <li><a href='#'>Contact Us</a></li>
</ul>
4. Change # with yours URL link and text with your text.
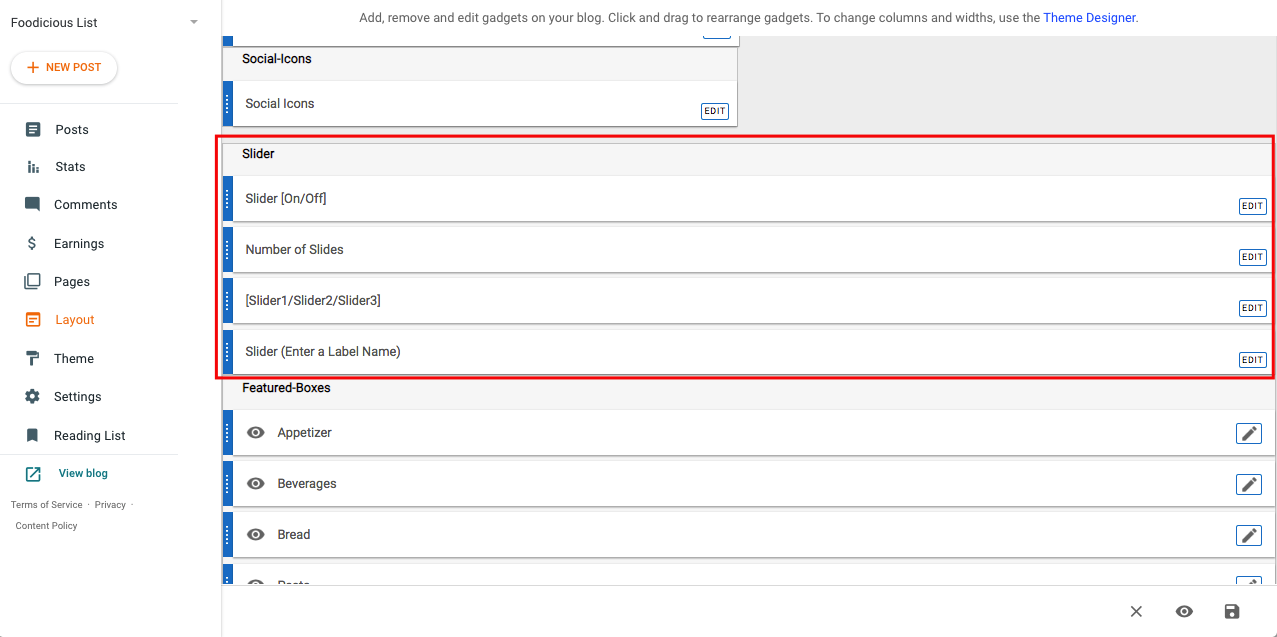
7. Slider
You can see the Slider on the theme, to put your posts to the Slider you need to give a label to the posts which you want to display on the Slider.
NOTE: All your posts must contain some Label.
This is self explanatory.
a) Slider [On/Off] will make it Enable or Disable. You just have to write ON to make it Enabled or OFF to make it disable.
b) Number of Slides: How many slides do you want. It accepts number.
c) Slider1/Slider2/Slider3: This shows different styles of slider. You just have to write Slider2 in this widget and Slider2 design will be shown.
d) Slider(Enter a label name): Just write a label name with correct case. That means if your label name is Example. Then you have to write the label name with capital E. If it is EXAMPLE, then you’ll have to write in all capital letters.
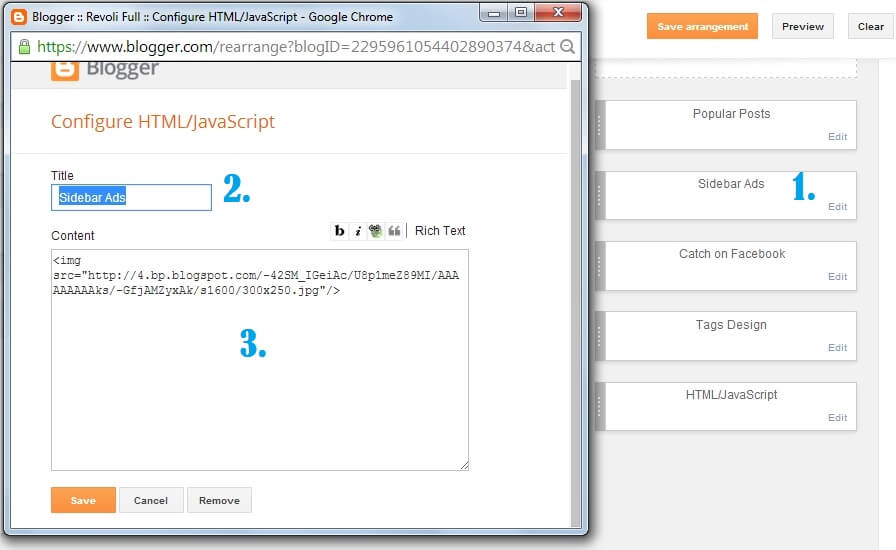
9. Sidebar Ads
To add your ads code to the sidebar, you can just go the layout section and click on edit and paste your sidebar ads code, refer to the image.
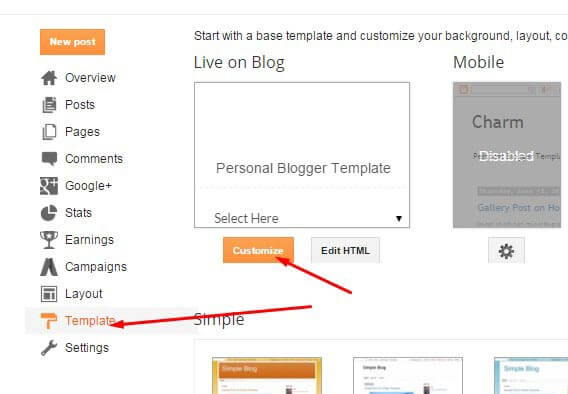
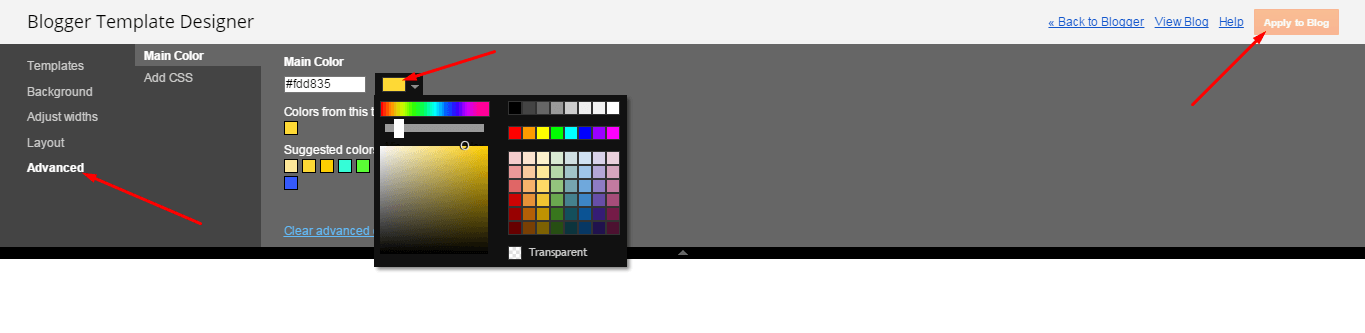
10. Website Infinite Main Color
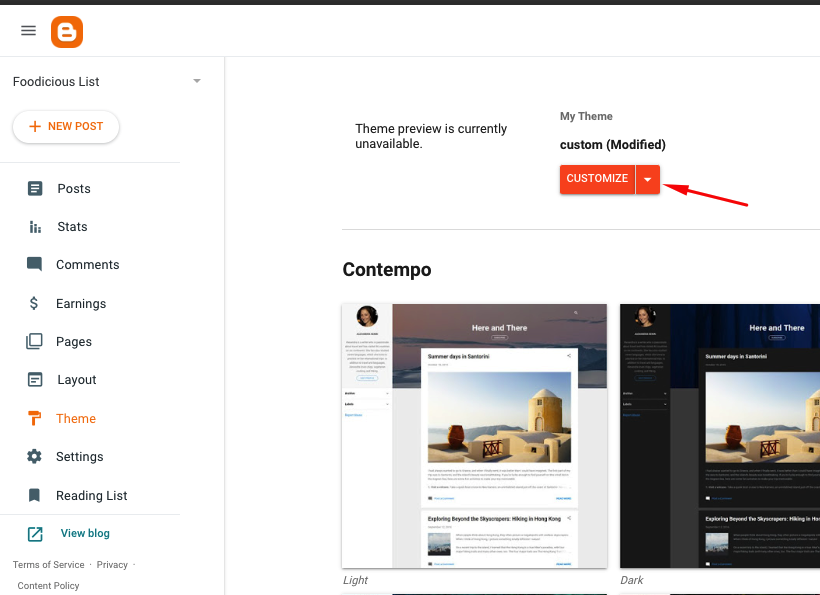
Access your blog Template > click Customize as shown in below Image:
- Then goto ADVANCED and select any color you want for the whole website.
11. Stay Connected Sidebar Widget code:
<div class="social-widget rounded">
<a href="#" class="facebook" target="_blank"><i class="fa fa-facebook"></i></a>
<a href="#" class="twitter" target="_blank"><i class="fa fa-twitter"></i></a>
<a href="#" class="instagram" target="_blank"><i class="fa fa-instagram"></i></a>
<a href="#" class="pinterest" target="_blank"><i class="fa fa-pinterest"></i></a>
<a href="#" class="youtube" target="_blank"><i class="fa fa-youtube-play"></i></a>
<a href="#" class="rss" target="_blank"><i class="fa fa-rss"></i></a>
</div>
12. Instagram Footer Code:
Access your blog Layout > click Edit link on Instagram Bottom widget
1. Go to snapwidget.com and generate your Free Instagram Widget embed code and paste that code here in this widget area and your Instagram will be shown.
13. Remove Footer Credits

You can change the footer credits from Layout -> Footer Credits.
Rest all things are self explanatory from the Layout section of the theme.
Read more here about the features of the template: Foodicious Template
Purchase this template from here: Buy Foodicious Blogger Template
[…] Foodicious is a fast and responsive Blogger theme built for food bloggers and recipe sites. It ensures excellent performance while maintaining a stunning visual appeal. […]