Welcome to how to install blogger template VideoPlay Youtube Video Blogger Template, below are the steps that will help you to configure and setup our VideoPlay Youtube Video Blogger Template.
If you are finding any difficulties configuring the template then you can go ahead and purchase our Template + Installation Package from here and our team will setup the template for you:
1. Installing the template
- Unzip the VideoPlay.zip file.
- On Blogger Dashboard Click Template.
- Click on Download Full Template to keep your old template as a backup just in case.
- Click Browse… button. Find the location of “VideoPlay Template.xml” select it.
- Then Click Upload.
2. Blogger Setting
After installing the theme, there are minimum settings to make all widgets work fine in this template.
- On Blogger Dashboard Click Settings.
- Click Other.
- In Site Feed > Allow Blog Feed Choose Full.
- Then Click Save settings.
3. Main Blogger Setting
- On Blogger Dashboard Click Layout.
- Click Edit on Blog Posts Widget.
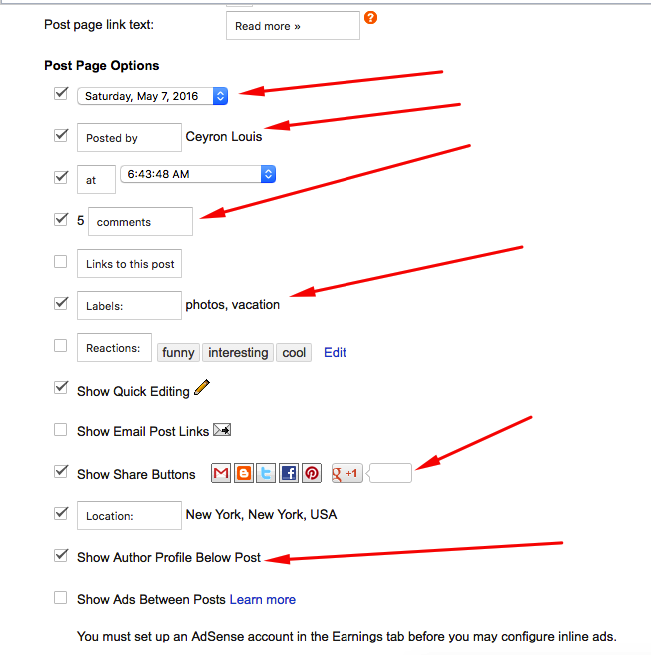
- Change it to look like that image.
- Click Save
4. Upload Logo
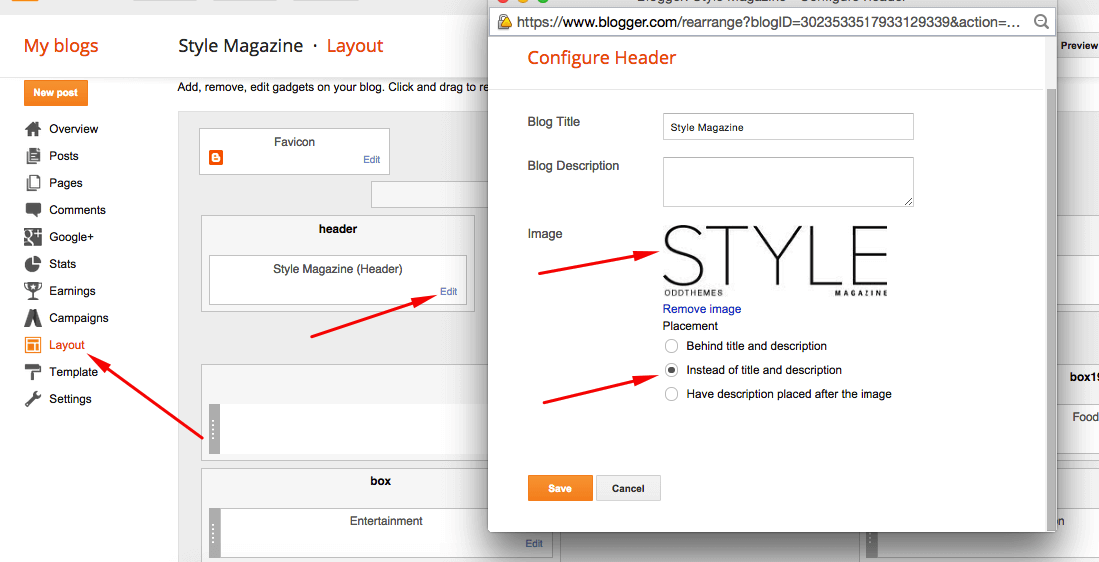
Access your blog Layout > click Edit link on Header widget

In Configure Header window, input your Blog Title and Blog Description. If you want to upload your image logo, make sure you check Instead of title and description, then click Choose File and locate your logo file. And click Save button to finish.
5. Setting up the menu
To Edit Menu in this theme you can follow these steps:
- On Blogger Dashbord Click Template
- Click Edit HTML
- Scroll down and Find this Code :
<ul class='topmenu1 megamenu' id='megamenuid'>
 <li><a href='/'>Home</a></li>
 <li><a class='menu-target' href='#'>Megamenu</a>
 <ul class='ulmenu'>
 <li><a href='#'>Travel</a></li>
 <li><a href='#'>Lifestyle</a></li>
 <li><a href='#'>Fashion</a></li>
 <li><a href='#'>Beauty</a></li>
 </ul></li>
 <li><a href='#'>Social</a></li>
 <li><a href='#'>Features</a>
 <ul class='singlemenu'>
 <li><a href='#'>Left Sidebar Post</a></li>
 <li><a href='#'>Fullwidth Post</a></li>
<li><a href='#'>Right Sidebar Post</a></li>
 </ul>
 <li><a href='#'>Blog</a></li>
 <li><a href='#'>Contact Us</a></li>
</li></ul>
4. Change # with yours URL link and text with your text.
6. Slider
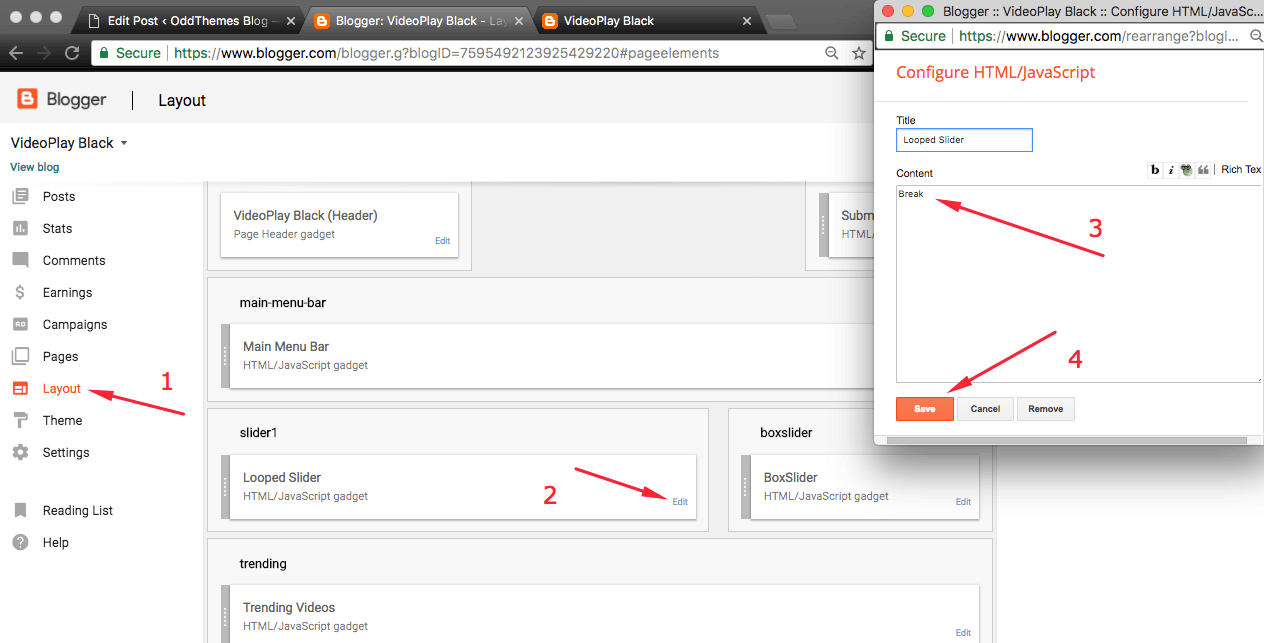
You Can See in the Slider on the template, to put your posts to the slider you need to put the Label in the Looped Slider in the layout section. Label must be used in the posts that you want to display on the slider.
NOTE: All your posts must contain some LABEL.
7. Editor’s Picks
You can add 4 posts in the Editor’s Picks area by adding label name to BoxSlider in the layout section as done with the Slider.
8. Trending Videos
You can set your own Trending videos by selecting videos and giving them any label, which then you can use in the Trending widget in the layout section. Only 5 trending videos are shown and it is not a carousel.
9. Homepage Post Sections
You can just set the labels as which posts you want to display in the Homepage Posts sections, where it says Fashion Videos, Headline News, Movie Trailer Videos and Traveling Videos. Latest posts automatically shows latest posts sorted by date.
10. Sidebar Ads
To add your ads code to the sidebar, you can just go the layout section and click on edit and paste your sidebar ads code, refer to the image.
11. Website Customizer
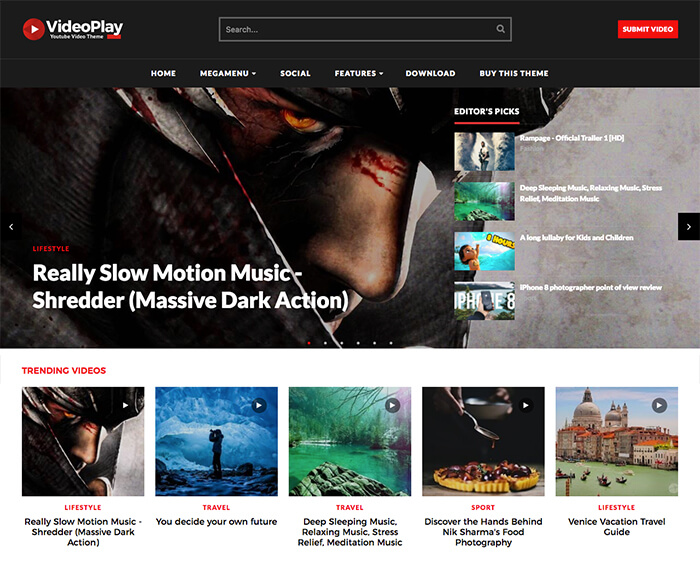
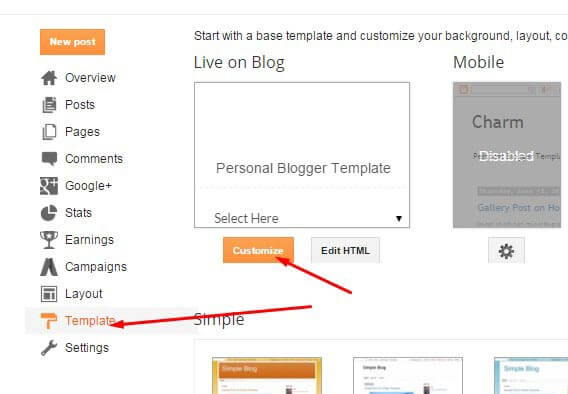
Access your blog Template > click Customize as shown in below Image:
12. Stay Connected Sidebar Widget code:
<ul class="social-iconz">
<li class="facebook"><a href="http://"><i class="fa fa-facebook"></i></a></li>
<li class="twitter"><a href="http://"><i class="fa fa-twitter"></i></a></li>
<li class="instagram"><a href="http://"><i class="fa fa-instagram"></i></a></li>
<li class="google-plus"><a href="http://"><i class="fa fa-google-plus"></i></a></li>
<li class="snapchat"><a href="http://"><i class="fa fa-snapchat"></i></a></li>
<li class="dribbble"><a href="http://"><i class="fa fa-dribbble"></i></a></li>
<li class="rss"><a href="http://"><i class="fa fa-rss"></i></a></li>
<li class="behance"><a href="http://"><i class="fa fa-behance"></i></a></li>
<li class="vimeo"><a href="http://"><i class="fa fa-vimeo"></i></a></li>
</ul>
13. Instagram Footer Code:
Access your blog Layout > click Edit link on Instagram Bottomwidget
1. Go to snapwidget.com and generate your Free Instagram Widget embed code and paste that code here in this widget area and your Instagram will be shown.
14. Footer Popular Posts
Footer Popular posts are automatically fetched by checking your most popular posts in your blog. If you’ve started your blog just now or it is new, then Footer Popular Posts will show nothing pand it will show posts as any of your posts gets popular by getting more views / reads.
15. Post Page Video Option
Post Page has two Video Options:
- Center
- Withads
Center Video Option makes the video on top in center with black background to give a subtle look and feel.
Withads Video Options make the video in the left hand side with two ads banner on right sidebar.
You can change the options from here:
16. Comment System (Blogger/Facebook/Disqus)
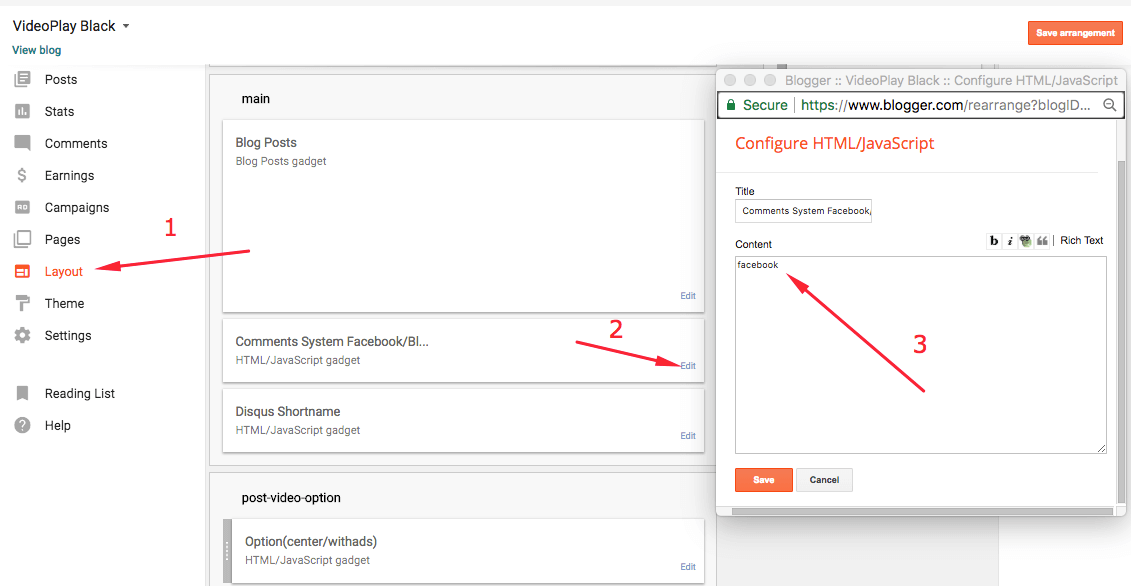
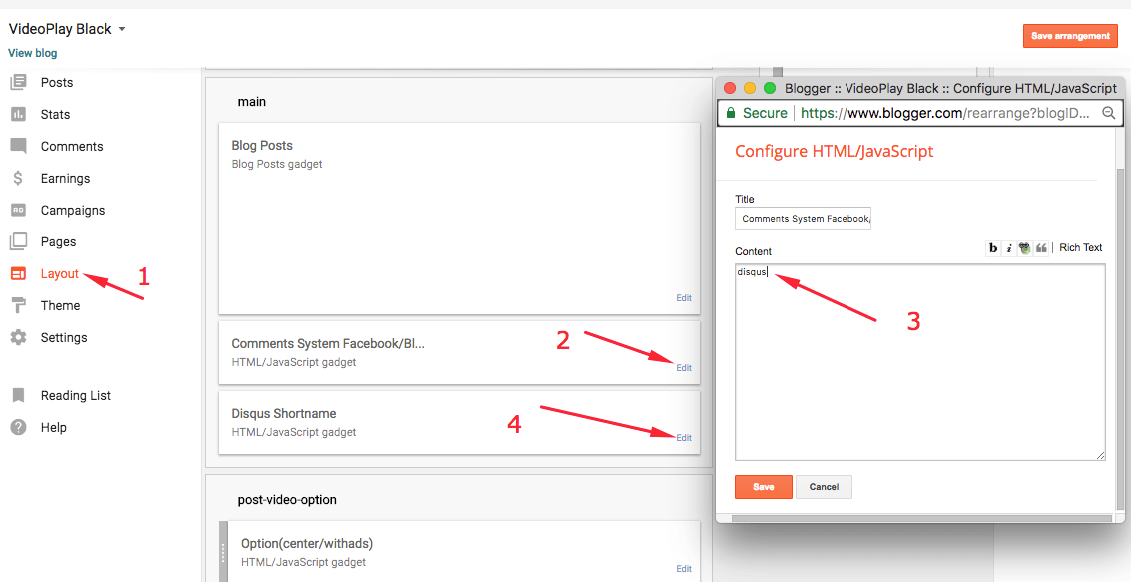
Our template features three Comment system. You can have any one comment system at a time. If you want Blogger then just type “blogger” in the Comment System Widget without quotes.
If you want Facebook Comment system then just type “facebook” in the Comment System Widget.
If you want Disqus then just type “disqus” in the Comment System Widget and add the Disqus Shortname in the next Widget.
17. Submit Video Button
You can put the Contact form url on the Submit Video Button, so that anyone who wants to submit their video can contact you directly and you can accept or decline their video request.
To put the link to the button you just need to add a url to the Submit Video Widget in the Layout Section:
We’re using Contact Page to display the Contact Form. If you also want to use the Contact Page to display the Contact form then you can insert this code in your Contact Page:
<div id="custom_ContactForm1" class="widget ContactForm">
<div class="contact-form-widget">
<p>Get in touch with us by filling out the form below.</p>
<div class="form">
<form name="contact-form">
<p></p>
Name
<br>
<input type="text" value="" size="30" name="name" id="ContactForm1_contact-form-name" class="contact-form-name">
<p></p>
Email
<span style="font-weight: bolder;">*</span>
<br>
<input type="text" value="" size="30" name="email" id="ContactForm1_contact-form-email" class="contact-form-email">
<p></p>
Message
<span style="font-weight: bolder;">*</span>
<br>
<textarea rows="5" name="email-message" id="ContactForm1_contact-form-email-message" cols="25" class="contact-form-email-message"></textarea>
<p></p>
<input type="button" value="Send" id="ContactForm1_contact-form-submit" class="contact-form-button contact-form-button-submit">
<p></p>
<div style="text-align: center; max-width: 222px; width: 100%">
<p id="ContactForm1_contact-form-error-message" class="contact-form-error-message"></p>
<p id="ContactForm1_contact-form-success-message" class="contact-form-success-message"></p>
</div>
</form>
</div>
</div>
<div class="clear"></div>
<span class="widget-item-control">
<span class="item-control blog-admin">
<a title="Edit" target="configContactForm1" onclick="return _WidgetManager._PopupConfig(document.getElementById("ContactForm1"));" href="//www.blogger.com/rearrange?blogID=8799058979810298021&widgetType=ContactForm&widgetId=ContactForm1&action=editWidget§ionId=sidebar-right-1" class="quickedit">
<img width="18" height="18" src="//img1.blogblog.com/img/icon18_wrench_allbkg.png" alt="">
</a>
</span>
</span>
<div class="clear"></div>
</div>
Just make sure you must use Contact Form in your sidebar Widgets or in the footer from Layout section. If you have any problems just drop us a email. Support is only given to the Premium users who have purchased the template.
Read more here about the features of the template: Video Blogger Template
Purchase this template from here: VideoPlay Video Blogger Template







Como coloca slide, ta bugando.
You just have to put Label name in the layout section. Its very easy.
you mean like this—> label1, label2, label3 or label1 label2 label3 or how can i put label in layout section
Conseguiu arrumar?
full width ? left sidebar ? How ?
Hi, Full Width, Left Sidebar are only available in the Full Version of the template. You’ll need to purchase the template for that.
The loop slide and the other topics here is not functional
Please read the documentation carefully. They are working perfectly. If you have any more concerns please contact our team at oddthemes@gmail.com
I’am requested in the e-mail.
My blog is not opening again after up loading this template what happen
Share your blog url.
gistusnaija.ga
We’ve replied to you on your email id. Thanks
https://uploads.disquscdn.com/images/dd6d4238b6c0a3be7115c99bd27597159161918f7e255e5b1b1208d3937a089d.png https://uploads.disquscdn.com/images/be68ec2a5e17f1218ed953257fa6d2b99ddaf05b4b6d9ac273b6176f89f6f5ad.png My blog is not opening again after up loading this template what happen
And how can I remove the videoplay play sign in post and reduce the size of the post header
Great theme. Please I need help. Slider is not working at the homepage. https://voplay.blogspot.com/
We’re extremely very sorry, you are using our free theme and we’ve given the documentation for our free users but we can’t provide our top notch support to free users. So you need to purchase the template for our support, also we have to check your website/blog for the issue. Thanks
I absolutely think you are right since you have provided all the documentation for reference purposes. Since I have been able to setup everything right by following the documentation I believe others will be able to do the same by following the instruction. I also believe that there might be a little problem with the homepage since I follow the instructions given in the documentation and the slider seems to be working at the homepage
Okay, you’re using BREAK as a label in the Slider. Just use your own Post label names. You have not used Break label in your posts. I hope this solves your problem.
Thanks a lot. Its work. You can have a look at it https://voplay.blogspot.com/
your mega menu is not working? (at features)
how to upload post???
embed video???
Just paste the embed code of any video in the post and then publish it. Theme will automatically take care of the rest.
what if i want to use a html5 video player?
You can try it out with our free version of the theme.
Working Perfect Everything
Please is your homepage slider working?
yeah,
yes working fine, before i don’t know about this theme. amazing theme. Thank you very much .
Nice to know yours is working. Can I please have a look at your site? Am currently working on “Submit Video” section.
We’ve given the step 17th for Submit Video section in this documentation.
here my google blog link – https://animelyrics9.blogspot.in
https://animelyrics9.blogspot.in/
Great website. Please how were you able to have different lables working at trending videos as well as editor’s pick. You can check up mine and teach me how to do that. https://voplay.blogspot.com/
For this, write the label of trending in the video of the post you want in trading.
you can add only one label in script or in your layout section and you can also add multiple labels in your post.
Amenorhu already read
Thanks for sharing your feedback.
How can i add multiple label in slider1 layout?
how can i put label in layout section??
how to add 3 or 4 label in looped slider in layout section? any idiea
how to add 3 or 4 label in looped slider in layout section?
If I add an ads code in editor pick section where you have the trending headline fashion after the headline if I put an ads code it will be an over size what wrong
show me your site, send link
one problem here in move gadget, hard to move gadget bottom to top, watch this video my made it – https://www.youtube.com/watch?v=TlxVZx2ctf4&feature=youtu.be
I want homepage slider to be showing more than one label https://www.ngvideos.club
What can I do to make it work
How do i add multiple slider level on slider section ? As when I try to add multiple levels such as slider1, slider2, slider3 on slider section, it is showing blank. I am able to add only one slider. Please tell me the trick to add multiple levels name in one section. Which sequence should i add. With comma, With break tag, With | or something other as I have tried all these but not working. Here is my blog http://body-2-mind.blogspot.com/
hi,i have label problem.How can i show all the labels of my posts?
How to put picture in slider?
i’m really not understand…plz
You have to goto layout section, edit slider widget and write Label name in the Slider widget.
Did you put some ad scripts into your template?
Because there’s a floating banner when I accessed my blog from phones.
But it never shows up from PCs or Laptops.
No we have not added any ad scripts in our template. Thanks
Then how can that happen?
That’s weird, cause I’ve seen it many times.
I think this is because of blogger widgets.
But it never happened before.
https://uploads.disquscdn.com/images/e6d1c0f80b6401c8ab2938c85e40e3aa65e0c494e28e4c703a94ea8a47a3a00b.png
Any solution?
Congratulation it is a great theme.
Why only the 5 fist labels works and the other label impossible to click? Look the image gif in this link https://gyazo.com/7ee58bfe6e22478e8d82cd468751e002
My blog
https://musique-des-annees-90.blogspot.com/
Hello,
You’re using our Free Version of the template. Please purchase the template and then we can fix your problem. Thanks
I can’t input multi label into Looped Slier. If i input single label the looped slier will work, but it’s not work for multi labels. Anybody can help me to resolve this matter. https://uploads.disquscdn.com/images/c59d05bffb6a4d899632d5dcfb7eacb7d07590c84ffc36b4e80f8f5dd64d4cc1.png
Mega menu not working
It Supports only youtube video please update that so that it will get poster image from video element
hello
I am making a website for the students who can not afford coaching and who are preparing for entrance exams like IIT JEE . I am bringing all the videos at one place so that any student can learn for free. I am using your free theme but it will be very helpful to me if i can get the premium theme so that i can add more functionality to my website i am not making this website for any profit . in fact i have not run even a single add on my website.It will be nice of you if you can provide me with the premium theme. I am myself a student so i cannot afford to buy this theme. But I will Credit your contribution in my about us page. I hope you will understand.here is the link of the website for proof https://jeedost1.blogspot.com/
Compre su THEME.
Tengo un Problema con el SLIDER. Cuando coloco muchas entradas, por algun motivo el slider deja de funcionar.
Mi web.
https://probandojeff.blogspot.com/
Mi web donde tengo pocas entradas, y si funciona slider.
https://probandojeff2019.blogspot.com/
https://uploads.disquscdn.com/images/384297dee14e0e5a7983d473d91e79f93660e797052e6bd428f606685897076f.jpg
oye men como cambiaste la parte editors picks ? el nombre por favor
Alguien me puede ayuda! no se como cambiar esto que dice Editor’s Picks
https://uploads.disquscdn.com/images/0fa488b0017ec92def506fc3a177cc9534dc66f23e9c5a165786949c7269d285.jpg
If more people that write articles involved themselves with writing great content like you, more readers would be interested in their writings. I have learned too many things from your article.
endzone video
Please I want your comment in order to improve this site http://republikcitynews.online/
I need help! I like the templates but the blogger post template has a problem. The video from youtube comes first rather than the title and the social share button also becomes duplicate. Help pls https://uploads.disquscdn.com/images/9409433216a3b4f4c0f73456b59e7729d8c0442048859b574ae22c66cfe2e4f9.png
Hello, you can purchase our Premium version of the template and our Support team will help you out in any issues of yours.
Thanks
Hello,
I wanted to know if the template can be purchased with support for vimeo videos.
Thank you
[…] By admin – April 26, 2019 0 1 Facebook Twitter Pinterest WhatsApp VideoPlay is Fully Automated Youtube Video Blogger Template. Just seat the video iframe inwards your post, thumbnails volition present automatically. If you lot accept a Youtube Channel as well as desire to present your videos on your website you lot tin role VideoPlay Youtube blogger template for showcasing your videos on your website amongst ease. This video blogger template volition automatically fetch the thumbnails from your videos as well as volition present them every bit displayed inwards the demo. VideoPlay is the perfect Video Blogger subject for YouTubers, Video Tutorials, Online Courses as well as video blogs. Influenza A virus subtype H5N1 premium template to monetize every type of video content, from fun videos to professional person tutorials. The documentation/instructions every bit how to setup this video blogger template is given hither which volition ask you lot through the whole template every bit how to setup or alter anything: VideoPlay Theme Documentation […]
Tengan excelente tarde, disculpen la molestia e interrupción, hoy tuve el honor de adquirir este tema, pero tengo inconveniente con la opción editors peack en el Boxslider, he tratado de colocar la etiqueta Boxslider pero no me funciona, que puedo hacer en este caso?
https://www.gabrielgodinezland.com/
I’m making a video website but your theme didn’t fetch all images correctly. I’m using your free theme. Can you please help me with this. My web URL https://relaxmotivation.blogspot.com/
The homepage slider doesn’t pull the image from the post. I’m not using Youtube videos, just videos from a video host, but I also add a featured image using img src… How do I fix this? I paid to buy the template.
hello is there someone who can help me to place “LOAD MORE POSTS”, on blogspot?
https://uploads.disquscdn.com/images/d3a386ba078e63b2e003b5058f2e26aee06d600356ad86b6101a3fd8b42e14b0.jpg
Hello dear, we can help you out if you purchase the theme.
Thanks