Welcome to how to install blogger template Charlotte Multipurpose Blogger Template, below are the steps that will help you to configure and setup our Charlotte Multipurpose Blogger Template.
If you are finding any difficulties configuring the template then you can go ahead and purchase our Template + Installation Package from here and our team will setup the template for you:
Blogger platform is very easy to use and understand. Moreover, it is absolutely free. Hence today we will let you know how to install a blogger template or how to install a blogger theme. We’ve crafted some simple steps for you to understand and install your blogger theme on your new blog or existing one.
For installing the blogger template there are two methods:
- Uploading XML Method
- Copy Pasting Template Code Method
How to Install a Blogger Template:
1. Uploading XML Method
- Download Blogger Template: First of all download the blogger template that you want to put on your blog. It will get downloaded in .zip file. You can choose from our Top Best Free Blogger Templates 2018.
- Extract the zip file: Zip file will contain .xml file which is the file that will get uploaded on Blogger, hence we will have to extract the contents of the zip file to obtain .xml file which is the template file.

- Login to Blogger: After you’ve the .xml file with you, now its time to login to your Blogger Dashboard. Goto www.Blogger.com and login with your google account. Just skip this step if you’re already logged in. Select the Blog you want to use or want to install this template to.
- Access Theme Section: Choose theme on the left hand side of the menu.

- Click on Backup/Restore: Before going next step, Please backup your previous template because, if you have any problem after uploading the new template, the backup file will help you for restore.

- Upload the XML File: Click on Choose File to upload the file.

- Select the xml file to upload it to blogger: If the extracted folder has many files, don’t worry you just need to select the XML file to upload it to blogger. The xml file will be named after the template file only.

- Click Upload: After selecting the file, just click upload button as shown in the picture below.

- Upload Successful: Now the upload is successful.
2. Copy Pasting Template Code Method
We were unable to save your theme.
Your theme could not be parsed as it is not well-formed. Please make sure all XML elements are closed properly. XML error message: Content is not allowed in prolog.
If you see the above error when uploading your template, then try this copy, paste method.
— Continue above steps still step 4.
- Open .xml file with text editor.

- Copy the whole code:

- Open HTML Editor on blogger:

- Paste coding on blogger HTML Editor:

- Template is Installed
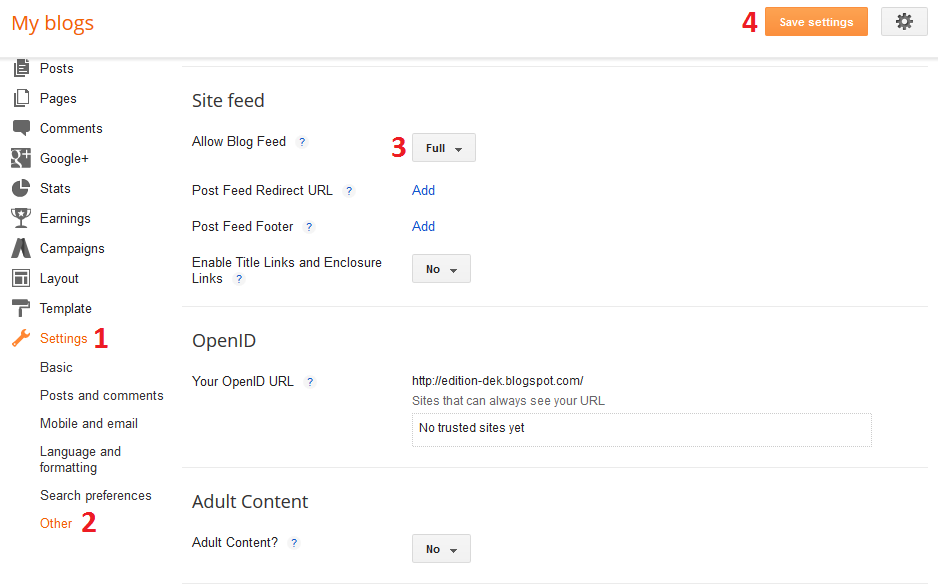
2. Blogger Setting
After installing the theme, there are minimum settings to make all widgets work fine in this template.
- On Blogger Dashboard Click Settings.
- Click Other.
- In Site Feed > Allow Blog Feed Choose Full.
- Then Click Save settings.
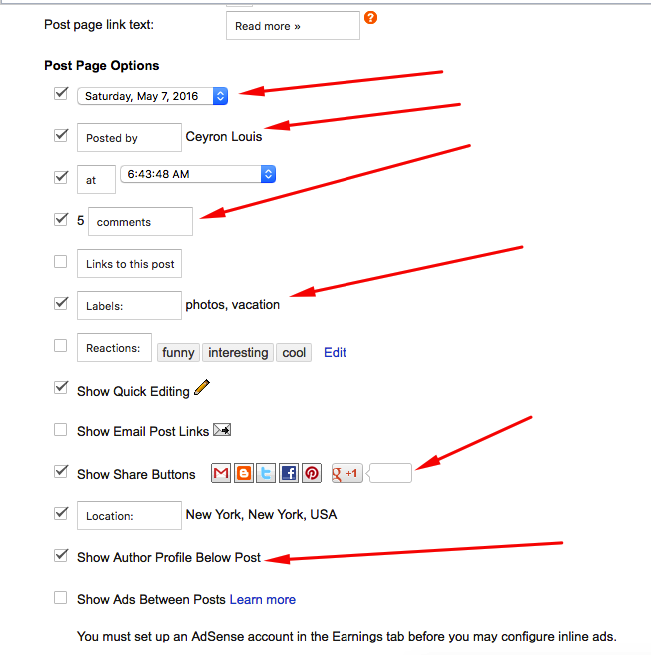
3. Main Blogger Setting
- On Blogger Dashboard Click Layout.
- Click Edit on Blog Posts Widget.
- Change it to look like that image.
- Click Save
4. Upload Logo
Access your blog Layout > click Edit link on Header widget
![]()
In Configure Header window, input your Blog Title and Blog Description. If you want to upload your image logo, make sure you check Instead of title and description, then click Choose File and locate your logo file. And click Save button to finish.
![]()
5. Setting up the menu
To Edit Menu in this theme you can follow these steps:

- On Blogger Dashbord Click Layout
- Click on edit of Main menu bar widget
- Paste this code in the content area:
<ul class='topmenu1 megamenu' id='megamenuid'>
 <li><a href='/'>Home</a></li>
 <li class='megalist'><a class='menu-target' href='#'>Megamenu</a>
 <ul class='ulmenu'>
 <li><a href='https://charlotte-simple-oddthemes.blogspot.com/search/label/Travel'>Travel</a></li>
 <li><a href='https://charlotte-simple-oddthemes.blogspot.com/search/label/Lifestyle'>Lifestyle</a></li>
 <li><a href='https://charlotte-simple-oddthemes.blogspot.com/search/label/Fashion'>Fashion</a></li>
 <li><a href='https://charlotte-simple-oddthemes.blogspot.com/search/label/Beauty'>Beauty</a></li>
 </ul></li>
 <li><a href='#'>Social</a></li>
 <li><a href='#'>Features</a>
 <ul class='singlemenu'>
 <li><a href='http://charlotte-simple-oddthemes.blogspot.com/2017/09/posing-near-wardrobe.html'>Left Sidebar Post</a></li>
 <li><a href='http://charlotte-simple-oddthemes.blogspot.com/2014/02/presentation-of-some-great-dish.html'>Fullwidth Post</a></li>
<li><a href='http://charlotte-simple-oddthemes.blogspot.com/2014/06/family-tea-time.html'>Right Sidebar Post</a></li>
 </ul>
 <li><a href="https://blog.oddthemes.com/">Blog</a></li>
 <li><a href="http://www.oddthemes.com/2018/03/charlotte-multipurpose-blogger-template.html">Download</a></li>
</li></ul>
4. Change # with yours URL link and Text with your text.
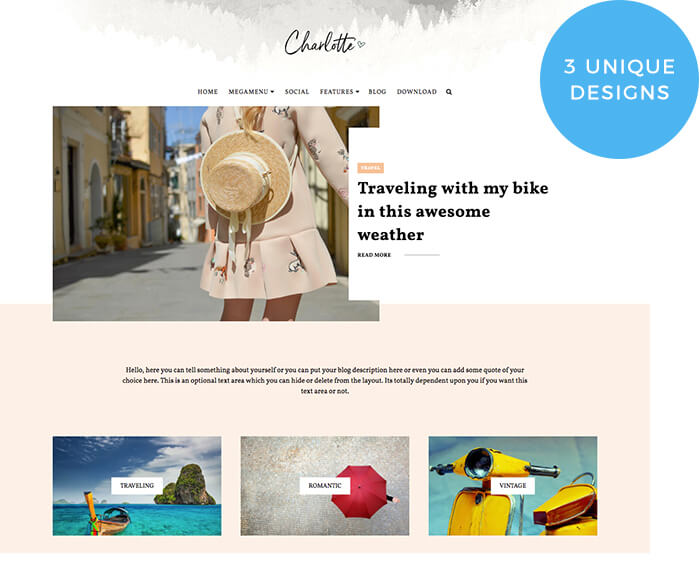
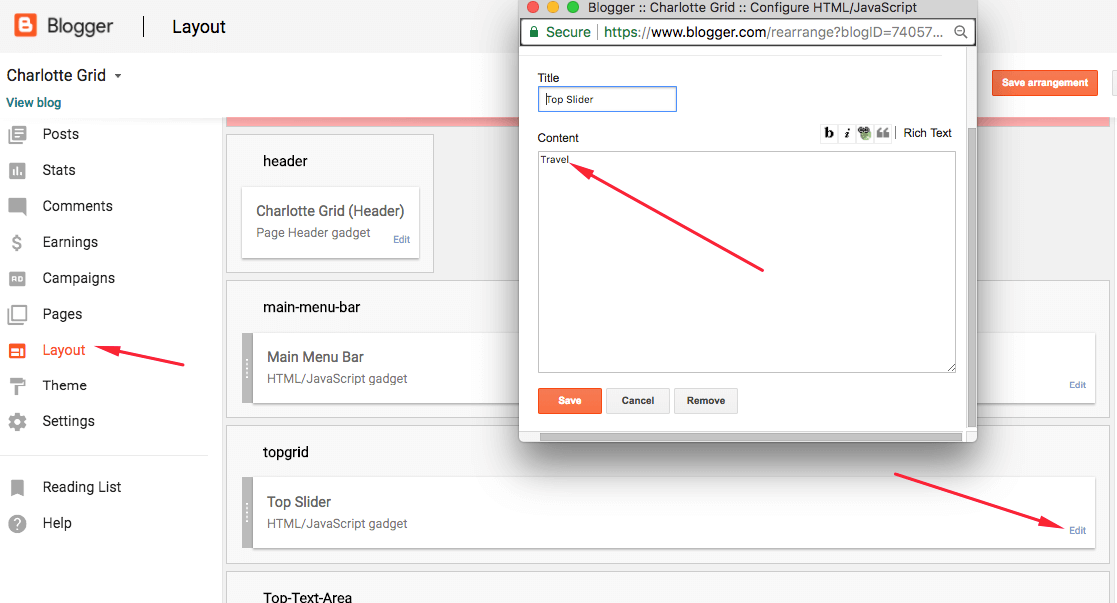
6. Slider
You Can See in the Slider on the template, to put your posts to the slider you need to put the Label in the Looped Slider in the layout section. Label must be used in the posts that you want to display on the slider.
NOTE: All your posts must contain some LABEL.
7. Theme Options
Theme options in this theme can be accessed from Layout Section, and it will look like this:

- Sticky Menubar[On/Off]: If you want Sticky Menubar then just write On in this widget content area. If you don’t want your Menu to be Sticky then just write Off in the widget.

- Preloader[On/Off]: Write On in the widget content area if you want the Preloader on your website. Write Off in the content area if you don’t want the Preloader on your website.
- Headers [Header1/Header2]: Write Header1 or Header2 in the Headers widget to define which header do you want on your website.
- Header1 Background [Image URL]: If you’ve selected Header1 in the Headers widget then you can put any image here in this widget to set the Header1 Background.
- Header Padding [In Pixels]: You can give padding in pixels in this widget. The padding is counted both from the top and bottom. Right now we’ve given 15px in this widget.
- Sliders [Slider1/Slider2]: You can choose either Slider1 or Slider2 in this theme.
- Category Background [Hex Color]: You can see the Category Boxes below Slider, you can choose background color for Category. In our demo we’ve selected #e7f2f8 this code.
- Post Styles [Simple/List/Grid]: You can select which post style do you want. Just write Simple or List or Grid.
- Pinterest Button[White/None]: Pinterest button style has shadow in the background. If you want that white shadow then just write White and if you don’t want the shadow then just write None in the Pinterest Button widget.
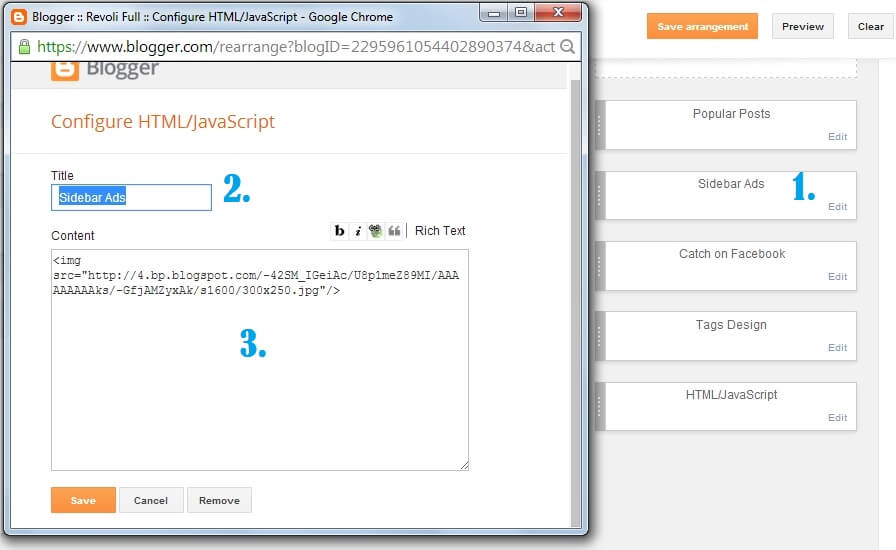
8. Sidebar Ads
To add your ads code to the sidebar, you can just go the layout section and click on edit and paste your sidebar ads code, refer to the image.
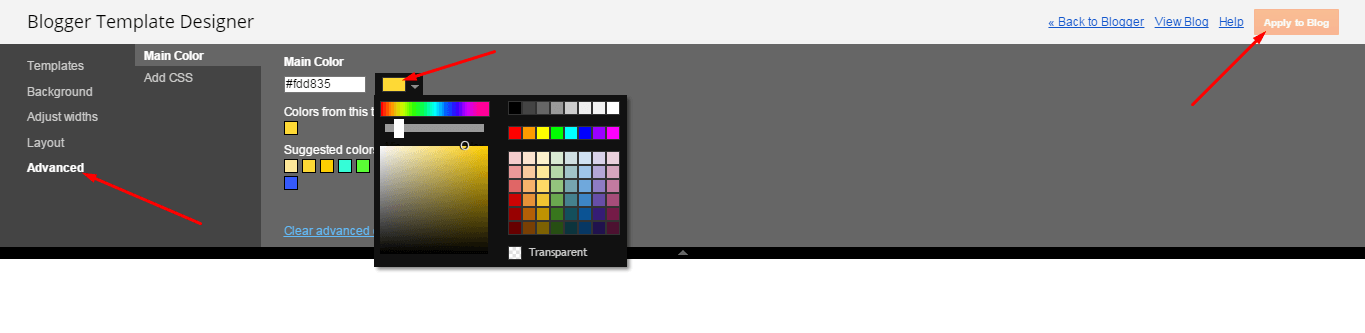
9. Website Main Color Change
Access your blog Template > click Customize as shown in below Image:
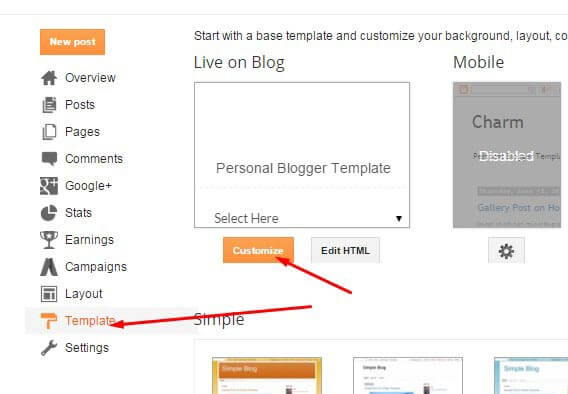
- Then you can edit the fonts, colors, etc as you want.
10. Stay Connected Sidebar Widget code:
<ul class="social-iconz">
<li class="facebook"><a href="http://"><i class="fa fa-facebook"></i></a></li>
<li class="twitter"><a href="http://"><i class="fa fa-twitter"></i></a></li>
<li class="instagram"><a href="http://"><i class="fa fa-instagram"></i></a></li>
<li class="google-plus"><a href="http://"><i class="fa fa-google-plus"></i></a></li>
<li class="snapchat"><a href="http://"><i class="fa fa-snapchat"></i></a></li>
<li class="dribbble"><a href="http://"><i class="fa fa-dribbble"></i></a></li>
<li class="rss"><a href="http://"><i class="fa fa-rss"></i></a></li>
<li class="behance"><a href="http://"><i class="fa fa-behance"></i></a></li>
<li class="vimeo"><a href="http://"><i class="fa fa-vimeo"></i></a></li>
</ul>
11. Instagram Footer Code:
Access your blog Layout > click Edit link on Footer Instagram widget
1. Go to Blogger Dashboard > Layout > Instagram widget > click on edit button > Edit Html
2. Now copy the below mention code and paste into widget.
<div id='instafeed'/></div>
<div class='instatitle'><a href="http://instagram.com/oddthemes">My Instagram</a></div>
<script type='text/javascript'>//<![CDATA[
var feed = new Instafeed({
get: 'user',
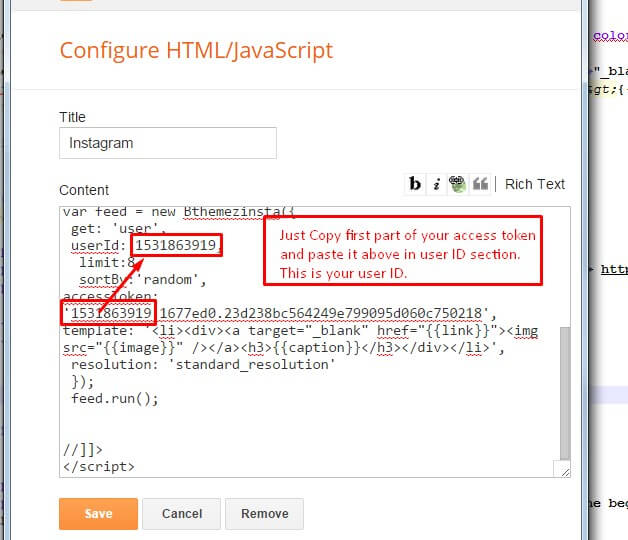
userId: 1553982550,
limit:6,
sortBy:'random',
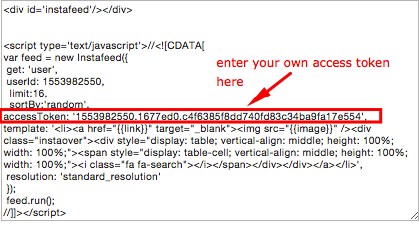
accessToken: '1553982550.1677ed0.c4f6385f8dd740fd83c34ba9fa17e554',
template: '<li><a href="{{link}}" target="_blank"><img title="♥ {{likes}}" src="{{image}}" /></a></li>',
resolution: 'standard_resolution'
});
feed.run();
//]]></script>
Generate your Instagram Access token by clicking on button from Generate Instagram Access Token

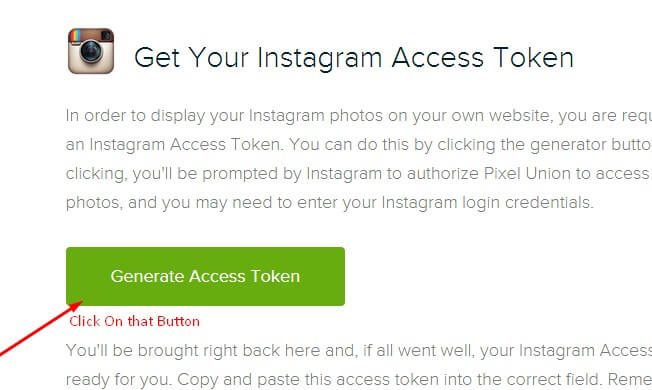
Now enter the access token here in Layout of the blogger template:
ALSO CHANGE THE USERID with yours to show your INSTAGRAM PHOTOS.
If you have any problems just drop us a email. Support is only given to the Premium users who have purchased the template.
Read more here about the features of the template: Multipurpose Blogger Template
Purchase this template from here: Charlotte Multipurpose Blogger Template
Love the template. Thank you so much.
Thanks so much 🙂
I loved this template, but i’m from brazil and i really want to know if exist a way to change “read more” for “leia mais”. This wil help me with my followers and people who read my blog. xx
Yes you can change readmore to leia mais but only after purchasing the theme. You can purchase the theme from here: http://www.oddthemes.com/2018/03/charlotte-multipurpose-blogger-template.html
Thanks
The menu bar submenus are not showing up correctly. The background is black and does not appear when you hover over the main menu item.
Hello dear, we’ve replied to you on your email. Please check. Thanks
Thanks for the great theme, which is live upon my site https://www.DrGyan.in. The only thing I didn’t like that, ” slider2 was not working upon my site”, however slider1 was working well, which I didn’t like too much. Even changing to slider2, there was no change. So I removed slider from my site.
my header is cut in the weird shape, i dont know whats wrong
Mine is the same. The background of menu bar submenus are black.
i cannot upload my photo in about author gadget
how can I resize my blog icon on header?
how can I change this preloader?
Excellent Theme, with lot of options to explore!
Just two quick questions:
1. Can I use multiple labels in the slider, if so, how?
2. What should be an ideal image size for the posts and slider?
PS: Already purchased this theme last week.
1. Multiple labels are not an option for the Slider, you can only set one label. If you want different posts of other labels as well, then you can do one thing, you can set Featured as a Label in all the post and can set this Featured label to all those posts that you want to show on the Slider.
2. The ideal size of the image for posts and slider would be 800 pixels in width and auto height.
Thanks
Very good job on this theme. Im trying it and i got the Top Menu broked. The background of menu bar submenus are black and it dont work as expected.
Any way to fix it or is it available only after i bought the pro version?
We can fix it for you only after you purchase the Pro Version. Please contact us at oddthemes@gmail.com after you purchase the theme. Thanks
Sorry.., but why my blog post displayed is not same with setting ? I do setting to displayed 6 blog post but what is happened, its displayed only 3 blog post and when i push button next / previous / older post its displayed only 2 blog post. why ?
Hello, if you’re a free version user then please purchase the template and we’ll resolve your issue. After purchase please contact us at our email id which is oddthemes@gmail.com.
Thanks
Hello! There are some things I can’t do with the template. I don’t know why because I think I’m doing it right. I really think you should write more explanations here. I’ve sent you an e-mail, but as I have no answer I’ll let it here:
1. The submenus in the main menu bar are not working. I’ve added the labels to the posts but when I go to the submenus it states “No posts available” instead of showing the pics and the titles of 4 posts, as it is shown in the live demo.
2. I can’t find anywhere a way to change the social media button to share the posts as it is extremely ugly and it doesn’t fit the template, which is more elegant and modern.
3. In the category section, where there are 3 big squares with a pic and the name of a category in the center, I can’t do anything. I mean, I can change the pic and the name of the categories, but I want to click on it and being redirected to all the posts of that category.
I hope you can help, please.
Regards,
Elena
Hi, I’ve purchased this template, but share buttons in the posts are not working. How can I fix it? Other question is how can I have some blogger posts with full width (without sidebar). Can anyone help me? Thanks!
We’ve replied to your email. Thanks