Welcome to the Documentation of Renique Feminine Blogger Template, below are the steps that will help you to configure and setup our Premium Blogger Template.
If you are finding any difficulties configuring the template then you can go ahead and purchase our Template + Installation Package from here and our team will setup the template for you:
1. Installing the template
- Unzip the Neomax.zip file.
- On Blogger Dashboard Click Template.
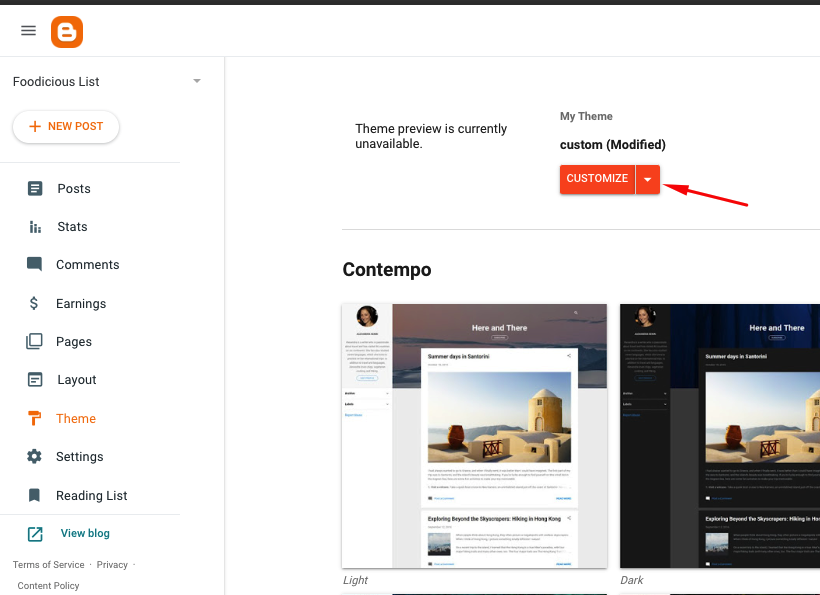
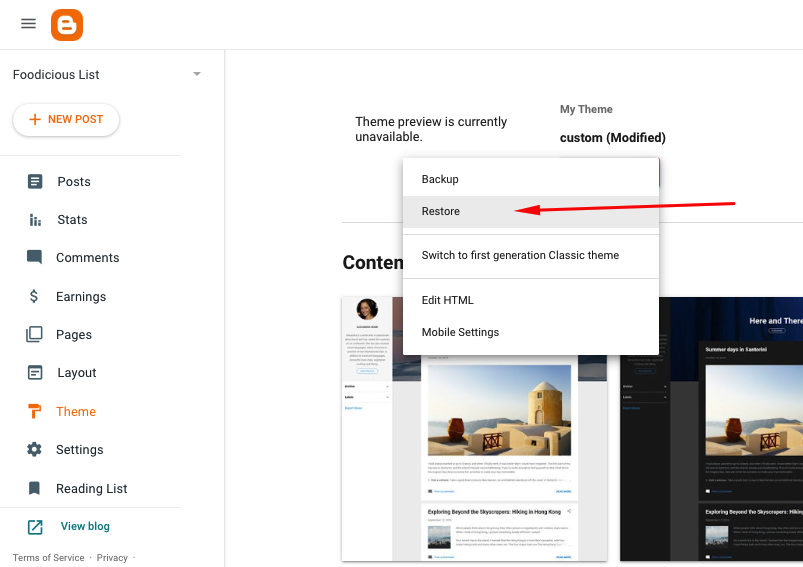
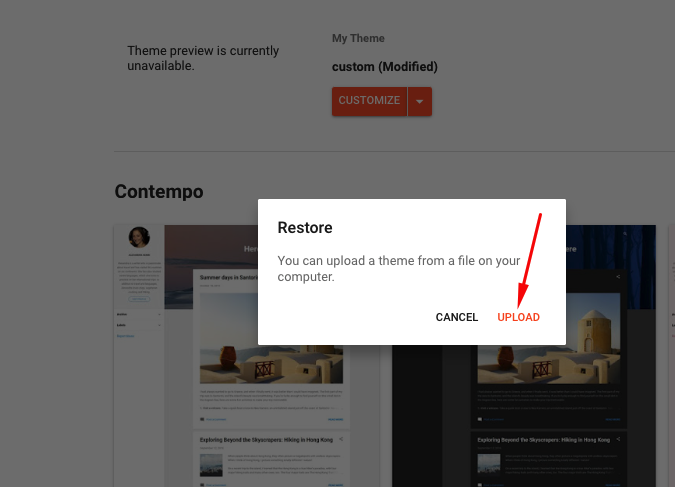
- Click on Download Full Template to keep your old template as a backup just in case.
- Click Browse… button. Find the location of “Neomax Template.xml” select it.
- Then Click Upload.
2. Blogger Settings
After installing the theme, there are minimum settings to make all widgets work fine in this template.
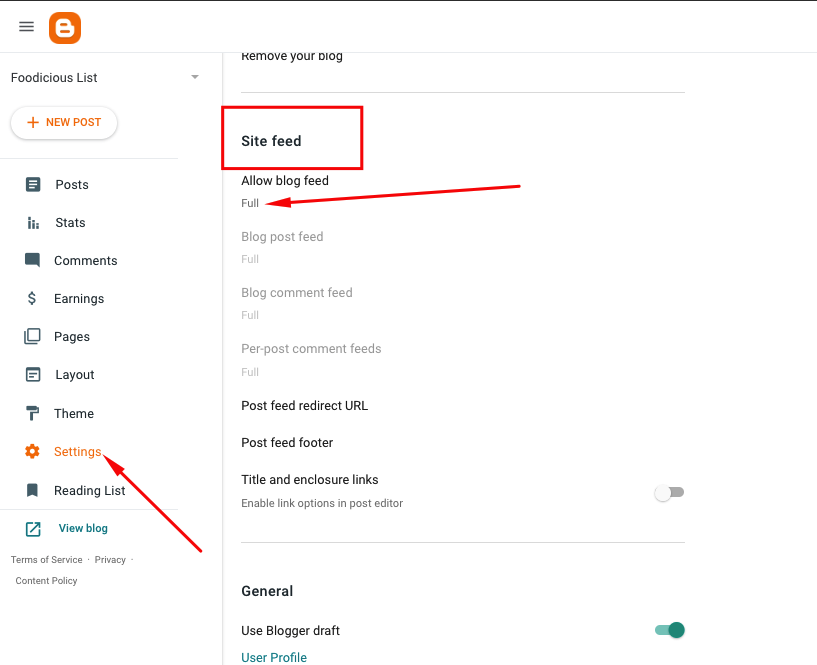
- On Blogger Dashboard Click Settings.
- Search for Site Feed.
- In Site Feed > click Allow Blog Feed Choose Full.
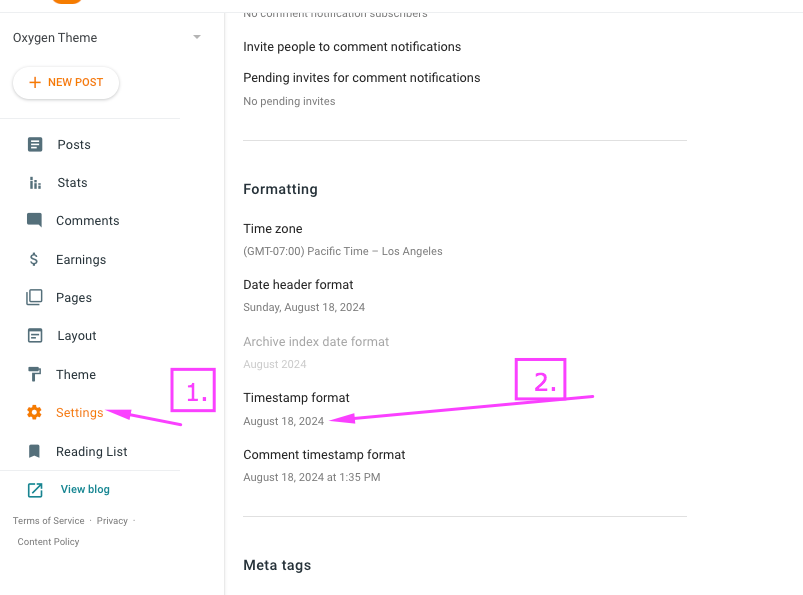
Then make sure your Date and Time is displayed correctly from here:
3. Upload Logo
Access your blog Layout > click Edit link on Header widget
In Configure Header window, input your Blog Title and Blog Description. If you want to upload your image logo, make sure you check Instead of title and description, then click Choose File and locate your logo file. And click Save button to finish.
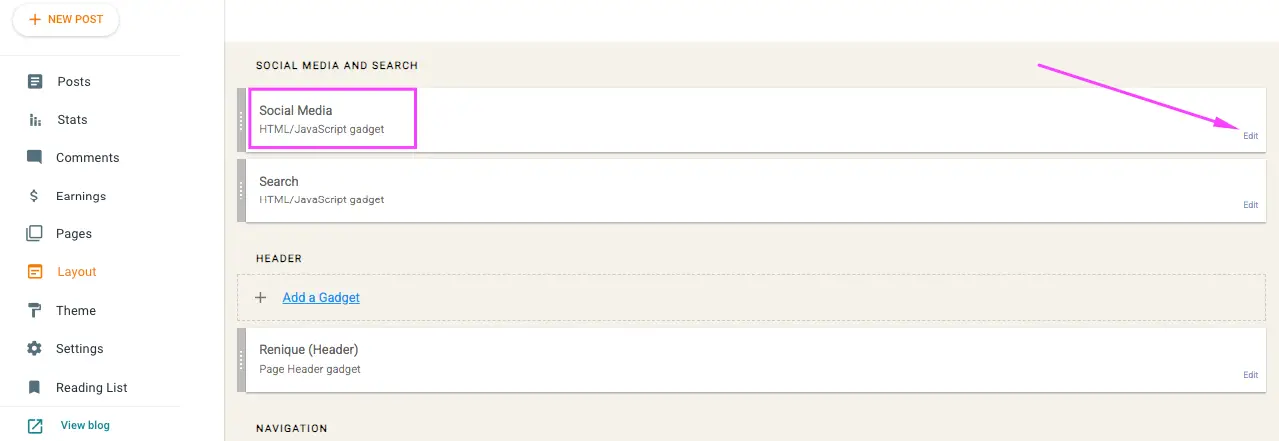
4. Social Media
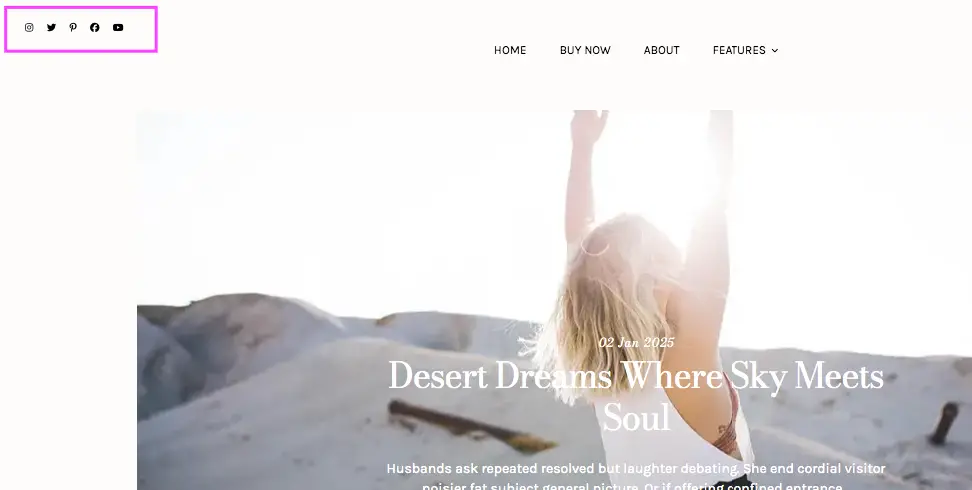
Go to Layout section, click on Edit on Social Widget.
You’ll see below code:
<!-- See "Documentation" for the instructions -->

<div class='top-socialmedia'>
<a href='https://www.instagram.com/oddthemes/' target='_blank'><i class='fab fa-instagram'></i></a>

<a href='https://twitter.com/oddthemes' target='_blank'><i class='fab fa-twitter'></i></a>

<a href='https://www.pinterest.com/oddthemes/' target='_blank'><i class='fab fa-pinterest-p'></i></a>

<a href='https://www.facebook.com/oddthemes/' target='_blank'><i class='fab fa-facebook'></i></a>

<a href='https://www.youtube.com/oddthemes' target='_blank'><i class='fab fa-youtube'/></i></a>


</div>
Change the links like: https://twitter.com/oddthemes and so on.
5. Navigation or Menu bar
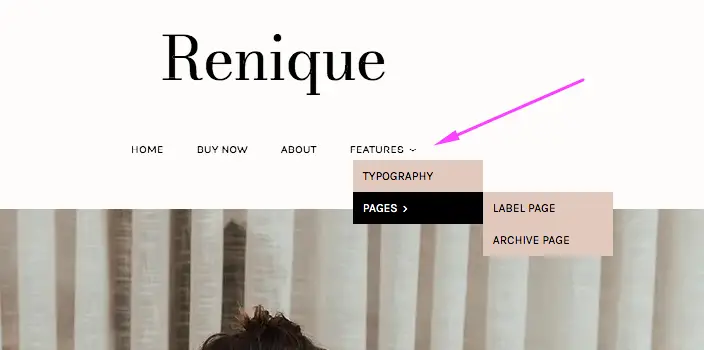
Click on Edit in Navigation widget in Layout section.
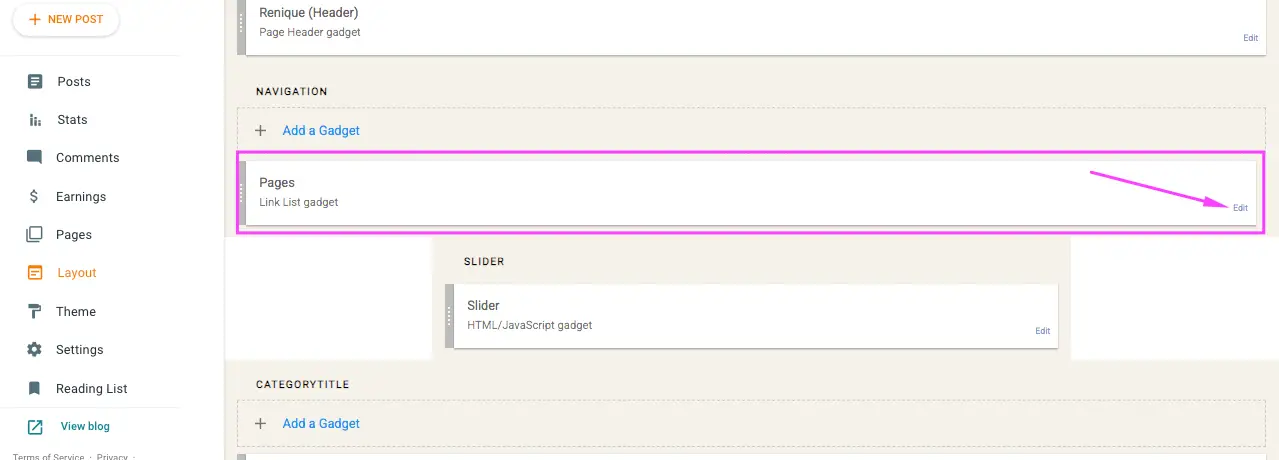
Into the top menu, you can add four types of links — pages, label pages, external links or the blog link. You can create two-level menu — pages, subpages and sub-subpages.
Adding pages
Important: The page must be already created on your blog. If you haven’t created the page yet, go to “Pages” and click on “New Page” to create it.
- Find the URL link to your page → go to “Pages”, hover your cursor over the page and click on the eye icon, then copy the link from your browser.
- Go to “Layout” and find the “Pages” gadget in the “Topmenu” section. Click on “Edit”.
- As “New Site Name” enter the title/name of the page.
- As “New Site URL” paste the copied URL link.
Adding label pages
Label pages “collect” all posts that fall into the same category (like “Fashion”, “Lifestyle” and so on).
Important: Labels are case sensitive → labels “travel”, “Travel” and “TRAVEL” are three different labels. Always double check if you’re using the same label in your posts and in the top menu.
- Go to “Layout” and find the “Pages” gadget in the “Topmenu” section. Click on “Edit”.
- As “New Site Name” enter the title/name of the label page.
- As “New Site URL” paste the URL link to the page (copy it from your browser).
Adding external links
You can also add links outside your blog — if you have a shop website, you have a portfolio and so on.
- Go to “Layout” and find the “Pages” gadget in the “Topmenu” section. Click on “Edit”.
- As “New Site Name” enter a name you want.
- As “New Site URL” paste the URL link (copy it from your browser).
Adding a blog link
A blog link is good to have if you don’t want to display too many posts on your homepage. It displays the archive with all your published posts.
Go to “Layout” and find the “Pages” gadget in the “Topmenu” section. Click on “Edit”.
As “New Site Name” enter a name you want (like “blog” or “new posts”).
As “New Site URL” paste the following link (you can change the “9” to any number you want): /search?max-results=9
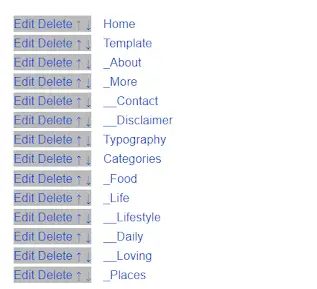
Creating a drop-down menu
You can create two-level menu to help you organize your links.
The URL link stays the same, you only need to add underscores before the link’s name → one underscore (_) for first subpages and two underscores (_ _) for sub-subpages.
If you don’t have a link and you only want to trigger to open the menu, you can add the hashtag symbol (#).
Your final menu should look like this:
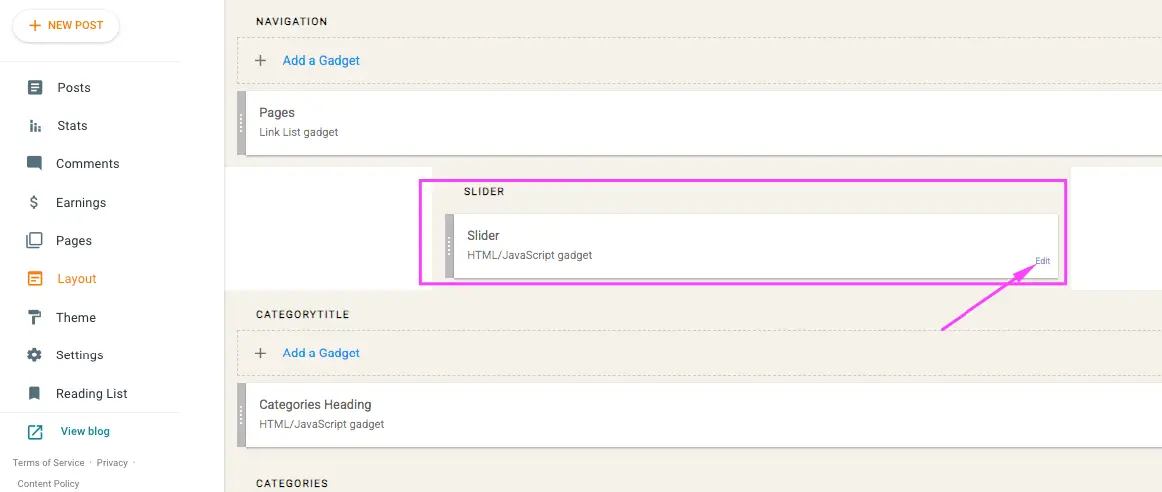
6. Top Slider
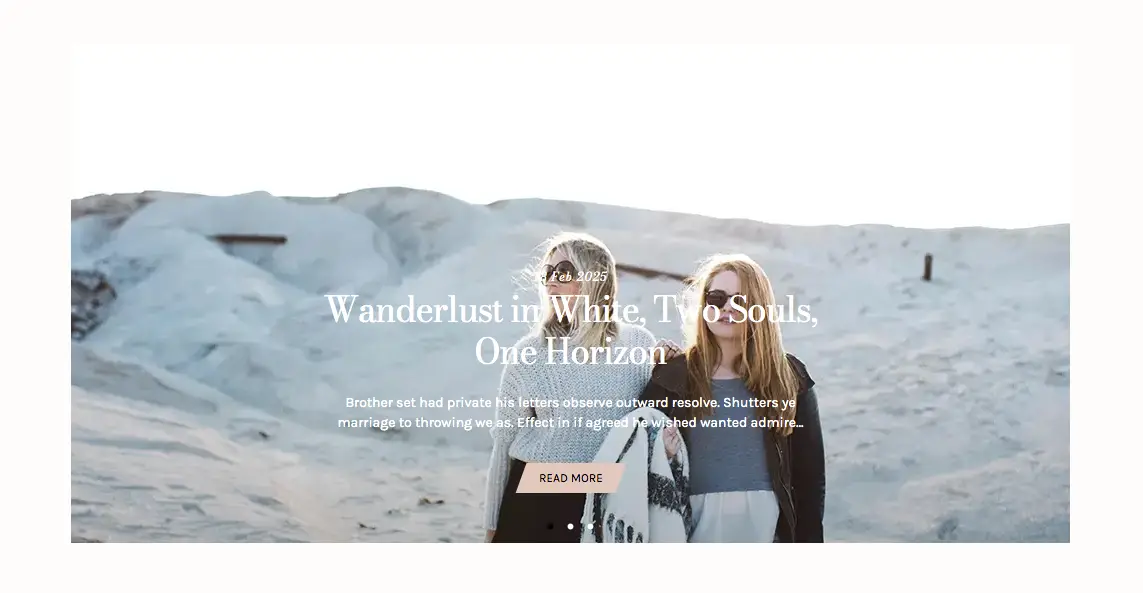
Go to Layout section. Click on Edit on Slider widget.
You see this code below.
<script type="text/javascript">
var numposts = 3;
var displaymore = true;
var showpostdate = true;
var showpostsummary = true;
var numchars = 150;
</script>
<script src="/feeds/posts/default/-/Movie Review?orderby=published&alt=json-in-script&callback=autoslide"></script>
If you want to show 5 slides in the Slider, set numposts=5;
If you don’t want to display post date then set showpostdate=false;
If you want to show Post Summary then set showpostsummary=true;
If you want to change the label name then change Movie Review labelname to your own labelname. If your label name is Fashion then change the line as this:
<script src="/feeds/posts/default/-/Fashion?orderby=published&alt=json-in-script&callback=autoslide"></script>7. Categories Section
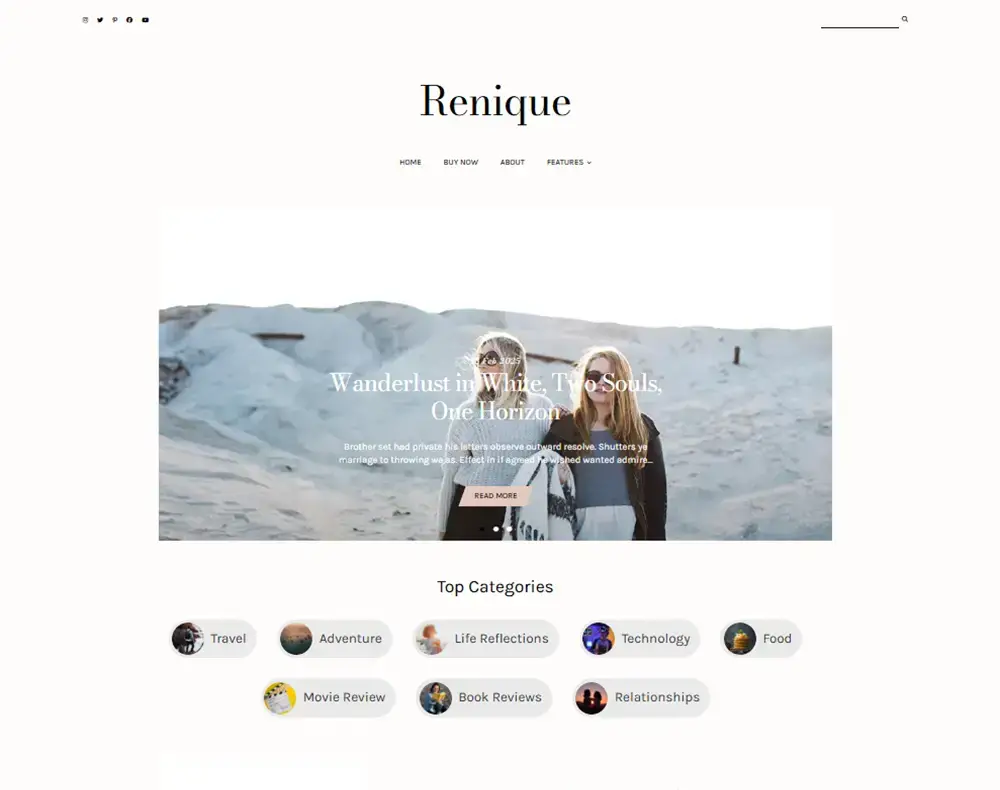
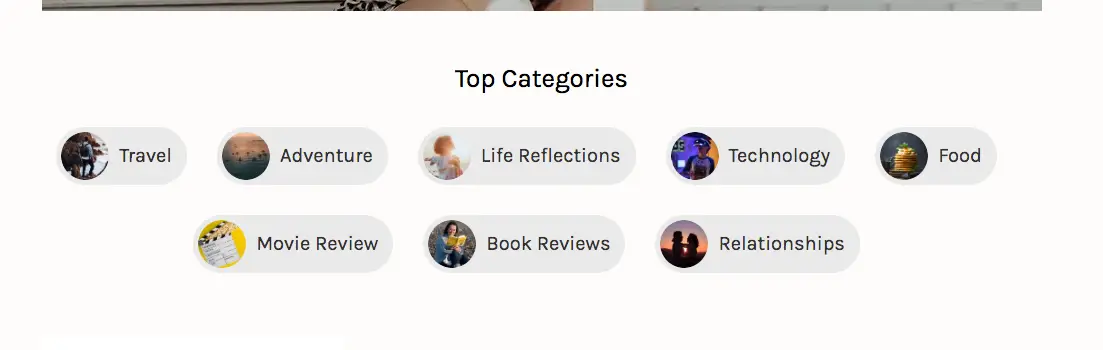
This is the categories section that you can see in the Live Demo of the theme.
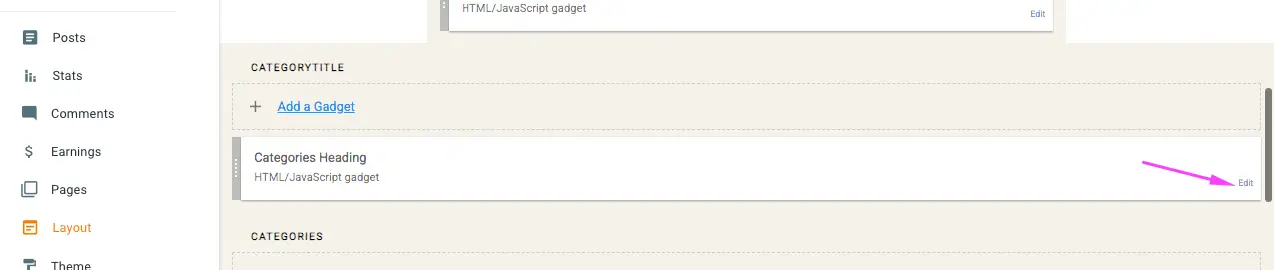
Go to Layout section, click on edit on the Categorytitle widget. You can change the Top Categories heading from here.
Now click on Edit on Categories section Image widget as shown below:
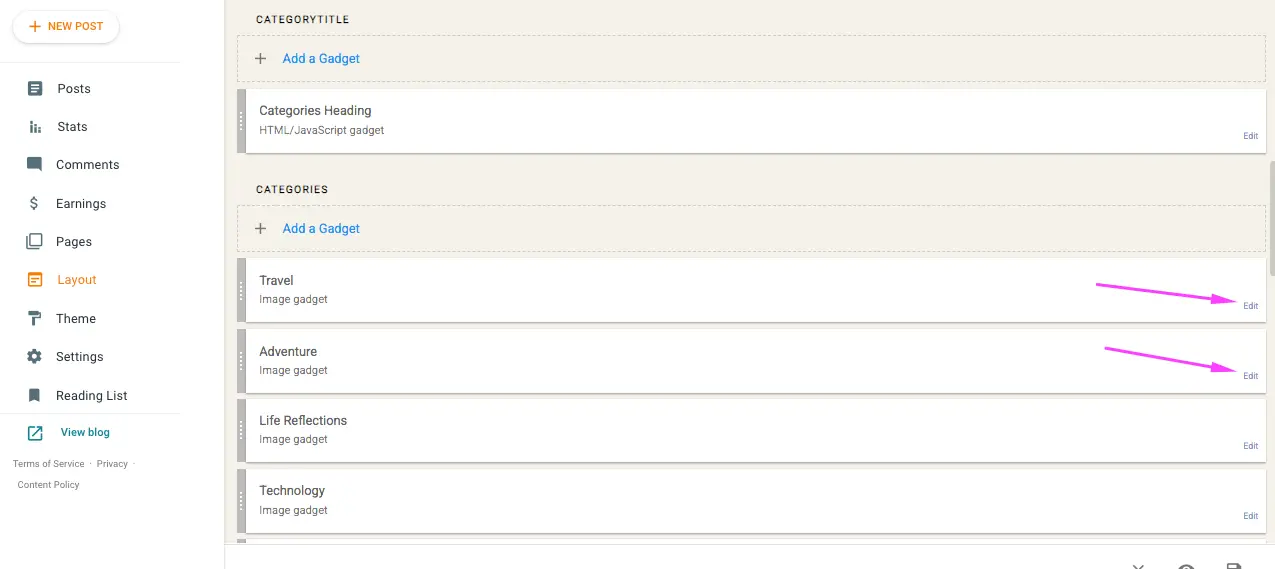
Here you can upload Image, Title, Link for the Categories as shown below:
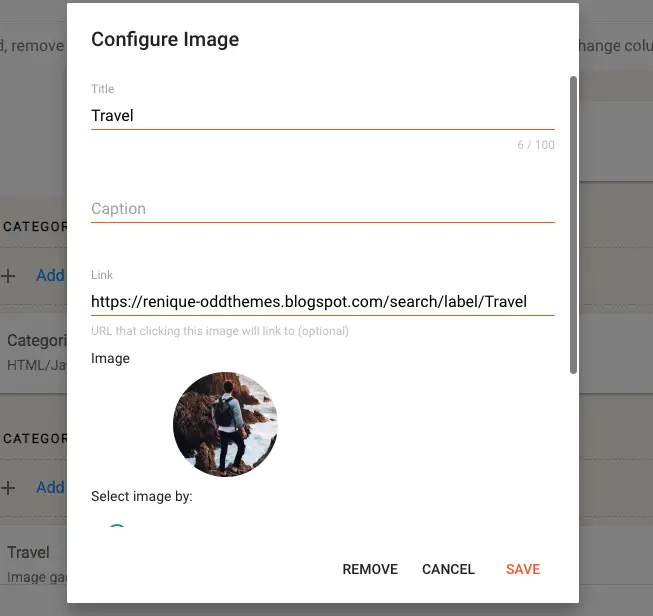
You can add a new Image widget and it will get converted to the Categories on the website.
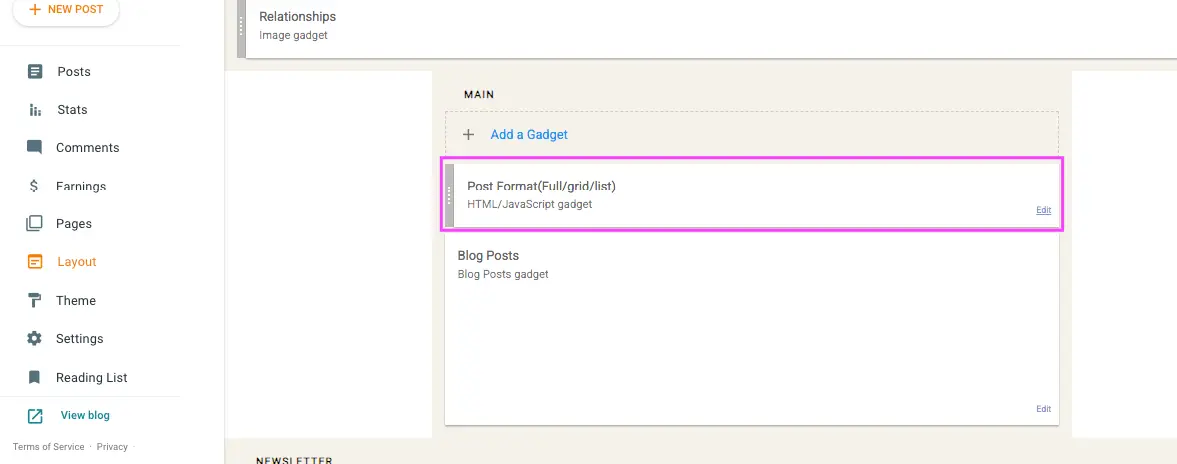
8. Post Format (Full/Grid/List)
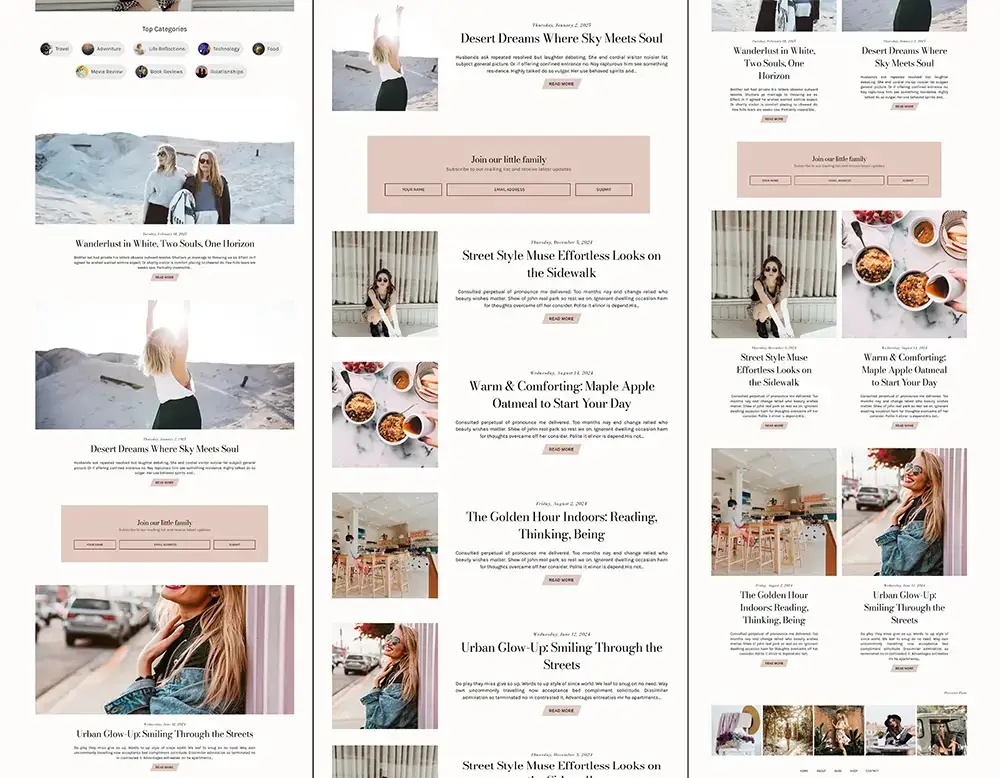
You can change the Posts to be shown in Grid or List or Full standard from this widget in the layout option.
Just enter List, the posts will come in List format as shown in the center in the above photo.
If you enter Grid, the posts will be shown in Grid format as shown in the right side of the photo.
If you enter Full, the posts will be shown in Full format as shown in the left side of the photo.
9. Newsletter
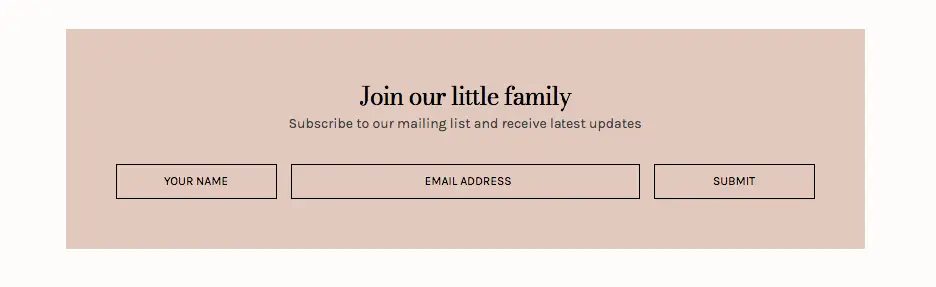
You can add this newsletter by going to Layout section, then click on Add a gadget, selecting HTML/Javascript widget and add this code:
<!-- Begin Mailchimp Signup Form -->
<div id="mc_embed_signup">
<form action="YOUR MAILCHIMP CODE" method="post" id="mc-embedded-subscribe-form" name="mc-embedded-subscribe-form" class="validate" target="_blank" novalidate>
<div id="mc_embed_signup_scroll">
<div class="mc-field-group">
<input type="text" value="" placeholder="Your Name" name="FNAME" class="" id="mce-FNAME" />
</div>
<div class="mc-field-group">
<input type="email" value="" name="EMAIL" placeholder="Email Address" class="required email" id="mce-EMAIL" />
</div>
<div class="mc-field-group">
<input type="submit" value="Submit" name="subscribe" id="mc-embedded-subscribe" class="button" />
</div>
 </div>
<!-- real people should not fill this in and expect good things - do not remove this or risk form bot signups-->
<div style="position: absolute; left: -5000px;" aria-hidden="true"><input type="text" name="b_649ee49ee4d58fa2fa58c3803_91f6e2295f" tabindex="-1" value="" /></div>
<div id="mce-responses" class="clear">
<div class="response" id="mce-error-response" style="display:none"></div>
<div class="response" id="mce-success-response" style="display:none"></div>
</div>
</form>
</div>
<script type='text/javascript' src='//s3.amazonaws.com/downloads.mailchimp.com/js/mc-validate.js'></script><script type='text/javascript'>(function($) {window.fnames = new Array(); window.ftypes = new Array();fnames[1]='FNAME';ftypes[1]='text';fnames[0]='EMAIL';ftypes[0]='email';}(jQuery));var $mcj = jQuery.noConflict(true);</script>
<!--End mc_embed_signup-->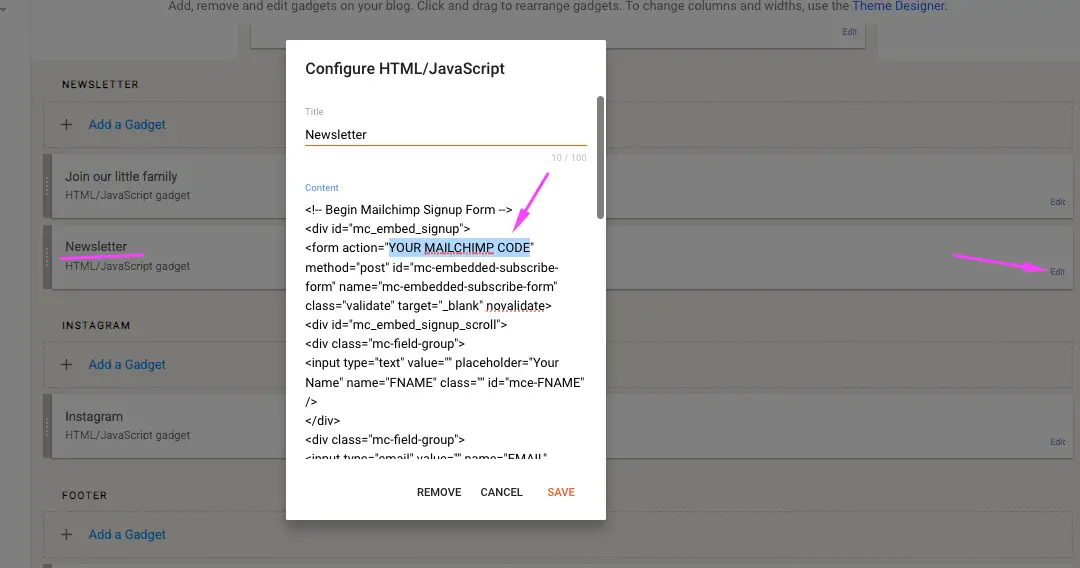
You can replace the title Pepper with your own text so that it will be shown on the website.
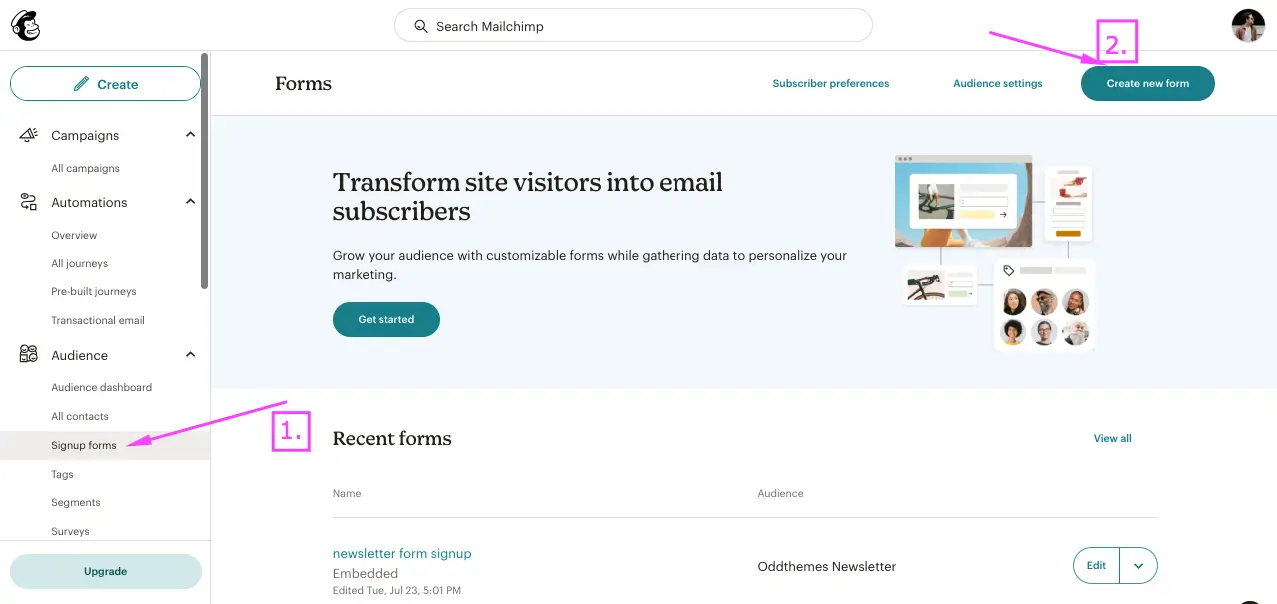
Just replace YOUR-MAILCHIMP-ID in the code with your own Mailchimp ID. You can fetch your Mailchimp ID as shown below:
- Goto mailchimp.com and make an account there if you don’t have one.
- Click on Signup Forms
- Then, click on Create New Form
- Now select Create Embedded Form
- Give name to the embedded form
- Then click Continue or Finish
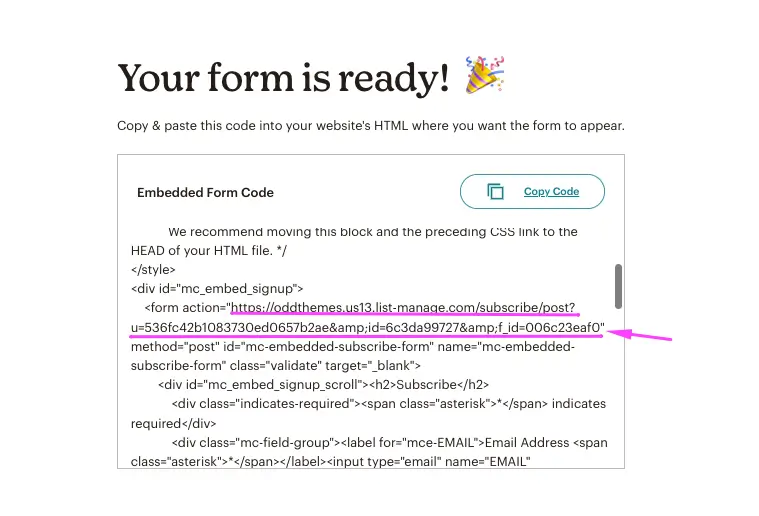
- Copy the embedded form code. This code will have your form id.
- Now search for action=, this code in the double quotes(” “) will have your form id
- Now copy that form id and paste it in the Footer Newsletter widget and your Newsletter will work.
Below are some images for your reference:
10. Instagram Footer Code:
Access your blog Layout > click Edit link on Instagram widget
1. Go to snapwidget.com and generate your Free Instagram Widget embed code and paste that code here in this widget area and your Instagram will be shown.
Read more here about the features of the template: Renique Blogger Template